Category Archives: Music

Drums Almost There

Last night I finished wiring all but one 3V piano light. They really sell the scene. Here, there are only four of them turned on in a dark room.

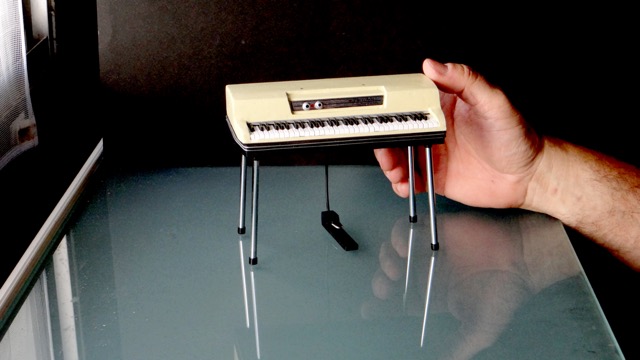
The only instrument left to do is the Farfisa, but I ran out of those nano LEDs until tomorrow’s delivery from eBay. Each of the seven substage platforms can have any combination of 3V, 5V or 12V lights — and they all interconnect via JST or 2-Pin soldered harnesses I made.

Meanwhile, today I finished wiring up and gluing down Patsy’s drum kit. I found a couple kettle drums left over from the rave scene in POSERS, so I made smart Pixel LED lamps out of them too. I’ll cut the translucent skins for them later, cuz I’m exhausted.

Ronaldo made those Ludwig decals for me. That’s the kit Nick Mason uses. It took four trips to Ace Hardware today to round up all the specialty hardware like 1/4” nylon and 1/2” brass grommets. Those nicely trim the holes in the substage bases which will route and hide all the wiring below decks during final assembly. Everything is glued down with either superglue, silicone adhesive or a hot glue gun. And each of those are very frustrating to work with. But it’s vitally important to glue down your set pieces when doing stop motion animation, since one fallen puppet or one bumped elbow can ruin a shot.

Stagecraft

Today I’m trying to finalize my stage layout, so I moved almost everything downstairs to the dining table again.

Here I have enough room to measure, mark and align each substage on 60° and 30° angles to form a near-perfect hexagon. I didn’t have a good protractor so I just printed one I found online, then marked each substage with pencil lines and red dots that are easy to line up.

The idea is to optimize for sight lines from my main camera track, and possibly one or more reverse angles. Once I make everything aesthetically and ergonomically happy, I’ll begin gluing things down and running the modular wiring connectors discretely out various holes in those upside-down gray serving trays.

I also solved my stool height problem by ordering these metal bed risers that are adjustable for height. Four of the substages will have these “stools” fixed in position so when I animate the scene, I don’t have to worry about them moving or being the wrong height for when a character plays an instrument. Some of the keyboards are shorter than they should be at 1:6 scale, so rather than putting them up on risers I can just vary their stool height and it’ll be less noticeable.

Wired for Sound

Wednesday I got my package from Brazil, much faster than anticipated. In it was all the 1:6 scale keyboards and synthesizers hand-crafted by Ronaldo. Simply amazing work, worth every centavo.

I immediately broke out my soldering station and went to work. First up was installing my own custom LED vacuum tubes inside the two HIWATT amplifier heads. This was as delicate an operation as it looks, negotiating the various layers of balsa wood and embossed paper. But once the 5mm UV lights are powered up, the effect is stunning.

Next came David Gilmour’s Hi-Fli Guitar Synthesizer. For this piece, I just drilled through it and installed one of ten N-scale train lights, securing it with a drop of super glue. Here it is lit up with a 3V battery pack (two AA batteries) for testing purposes.

The AKS synthesizer is probably my favorite piece. It doesn’t have a stand and I want Roger Waters to be using it in my scene while standing upright. And because he’s 79 years old I thought, hey, why not reuse the medical walker I made for James Bond in POSERS? It’s a near perfect fit. I only had to make a foam board brace across the bottom of the AKS’s briefcase shell to hold it in place. Then I mounted another piano light to it and attached a foot switch for it (not pictured).

Today I added three more vacuum tubes inside the open back of the Hammond organ’s cabinet. This too was tricky, but I eventually found a way to route their wires in a self-contained manner. The Hammond also got two piano lights on the left and right sides, up top. There was no place where I could drill straight through, so instead those wires make a 90° turn and come out the sides.

I also added lights to all the other instruments, including a sixth microphone. I’ll post better photos once I get them all placed on stage and wired up to power. I’ve made the connections as modular as possible but avoiding a rat’s nest will be a challenge.

This project involved a crash course in soldering. Some of these wires are literally the size of a human hair. It still takes lots of trial and error to successfully attach these tiny 2-pin connectors to 28 AWG and Kynar bare wire I can barely see. And my $79 soldering station’s “helping hands” are minimally helpful, as is its lighted magnifying glass — which is just in the way. But, I started to get the hang of it after a few frustrating hours of swearing and starting over. It feels good to learn a new skill and level up a bit.

Keyboards & Synthesizers

Ronaldo has finished crafting Rick Wright’s 1:6 scale synth bay. From left to right:

  • HIWATT amplifier head (one of two)
  • Leslie 122 Cabinet Speaker for the Hammond organ (under the HIWATT)
  • Wurlitzer EP-200 Electric Piano
  • Hammond RT-3 Two-Manual Console Organ
  • Mini Moog Model D (on top of the Hammond)
  • EMS Synthi Hi-Fli Guitar Synthesizer (used by David Gilmour)
  • Fender Rhodes Piano 73 Stage
  • Synthi AKS Synthesizer (on top of the Rhodes)
  • Farfisa Combo Compact-Duo Organ
  • Binson Echorec (on top of the Farfisa)
  • EMS VCS3 Putney (on top of the baby grand piano)
  • Azimuth Co-ordinator (not pictured)
  • The pictured Steinway & Sons Baby Grand Piano is not something I commissioned. I’ll be using my own 1:6 scale Sega Grand Pianist — which actually works with animated keys, using MIDI files.

Shipping from Sao Paulo, Brazil to Portland, Oregon will cost $54 US and take 8-12 days, plus customs. All 13 pieces cost $2,044 total. And after this complete set is wired for miniature lights and then screen-used, the value can only go up!

Studio A

My main 7×4′ animation stage gets some new concrete vinyl made by VViViD. That stage is just particle board and it saw a lot of abuse during the making of #POSERS. It was covered in neon paint and fake blood splatters, rivulets of adhesive residue, screw holes and pencil marks used to block out props and character marks. I used this same vinyl before to cover our dining room floor under the table I used to simulate two levels of Trump & Putin’s evil lair. Easy to lay down (with the backing peeled off in two-foot sections), and easy to peel off when you’re done. Affordable too!

That 48″ diameter black base is jigsawed from a 1/4″ piece of Vietnamese plywood from Home Depot. Only $17 compared to $50 for 5/8″ American plywood or $85 for 1/4″ PVC foam board. Of course I did the labor and painted it matte black with a clear lacquer coat, dodging several spring rainstorms here in SW Portland. Interestingly, that finish is still tacky enough where I don’t have to permanently glue the seven substage boxes to the base.

That 36×18″ black wire rack will be swapped out for a 48×24″ version this week. I’m just waiting on the unique three-sided base frame to arrive from a restaurant supply company in Kentucky. I hate buying anything from a red state but I didn’t really have a choice here. The rack looks like trusses on concert stages. The larger size will allow it to straddle the superstage and potentially allow the substages to animate as a planetary gear set.

Staging

Here’s what I’m gravitating to for stage design:

Gear Generator

This is a planetary gear set that can be cut from MDF or plywood, then painted to look like rusty metal.

Each of the six planet gear substages will have its own LED lighting system. So the challenge here, in a kinetic art installation pulling double duty as a theatrical stage, is how to run the wiring for lighting. The cables have to be somewhat hidden and also flexible enough to travel in crazy ways for at least half of one revolution around the sun gear. Wires also need to be routed through the floor of each substage at strategic points.

So here’s my solution:

Six of these wooden trays will serve as the bases for the planet gears, set upside-down. The handle holes will provide access for concealing various cables and controllers.

This is how I visualize the synthesizer bay, estimating the space required in square inches. Rick Wright’s station will probably span two of the 15-3/4″ diameter substages with properly meshed gear teeth that protrude.

Those speakers and the HI-FLI are actually for David Gilmour’s guitar station. But this is generally how I landed on the wooden tray idea, using only the larger sized trays. It’s possible I could use the smaller diameter trays to allow the substages to revolve independently.

The concept here is that because Time is such an important theme (and a brilliant song) on The Dark Side of the Moon, I want the stage to resemble gears in a timepiece. Then I might animate the stage kinetically, using a stop motion animation technique called hand-cranking.

Gearing Up!

Brazilian master craftsman Ronaldo Lopes Teixeira is almost finished with his work. We may go ahead and add Rick Wright’s Farfisa Compact Duo organ to the mix. That way every instrument used on The Dark Side of the Moon will be represented in this amazing 1:6 scale collection.

Cloche

Zoot & Dingo get their own vacuum tubes. These 14-inch bell jars are $50 each on Amazon. Perfect size. And the bases are MDF, so I can drill in the wires for their UV lights.

I also got my first of two 1:6 scale Fender amps today. These will be perfect bases for Ronaldo’s HIWATT heads.

The backs are open, which gives me access for installing the HIWATT vacuum tubes’ wiring, via holes drilled up through the cabinets.

Meanwhile, Ronaldo has made epic progress on the 1:6 scale Wurlitzer EP-200 Electric Piano. We had waffled between chocolate and vanilla cabinet colors and settled on vanilla as being more authentic to The Dark Side of the Moon’s Wurly at the Abbey Roads Studio in 1973.

This is the kind of research Ronaldo does. And he’s very good at it. We debated whether that Wurly is beige, or black with deceptive light on it. But we decided beige (or what they called Vanilla) was more retro.

Hammond RT-3 Organ

Ronaldo has been busy creating the 1:6 scale Hammond RT-3 Two-Manual Console with Leslie 122 Cabinet, used by Rick Wright of Pink Floyd.

Here’s the back of this iconic organ. I will fit it with some UV vacuum tube lights.

And here’s the back of the speaker cabinet. The speakers actually spin around at different rates, to produce that distinctive sound. It’ll get some of the same vacuum tubes of course.

Vacuum Tubes

Here’s the first tube. The glass is a perfect fit! I only had green fishing line on hand but this is proof that a more detailed internal structure will glow and breathe. Shown here powered at 4V. The size is 7mm diameter and 32mm long.

Here is it powered at 12V. I will install eight of these inside Ronaldo’s two HIWATT amplifier heads.

Here are the unpowered placeholder bulbs Ronaldo is using.