Iconic

Today I ordered a cool aluminum patio table for the RETROpad:

It reminds me of the “futuristic” architecture at Tomorrowland in Disneyland, or maybe EPCOT Center. Seeing all that as a kid in the 70s made quite an impression. This table comes in three shapes, but seating six in a triangle is pretty unique. And of course the red and white paint was a no-brainer to match the RETROvan. Olivia suggests a turquoise umbrella, which is worth a try.

I ordered a pair of custom chrome emblems from pidplates.com. These cost $76.95 and should arrive in a week. I’m thinking of putting them on the fenders over the front wheel wells.

And I ordered a pair of these 60″photo ledges, which may be ideal for suspending my custom clapboard headrests on the walls, between the backrest cushions and the windows. This may work better than Velcro, but if not I can always return them to Home Depot.

I received my two grab bar shelves today and they’re awesome. There are a few good options for placement. The white plastic tray is not attached to the chrome, as expected. So I’ll try securing them with silicon adhesive.

And I picked up my window decals from Signs Now and, well… Why would a professional graphic designer think they can just substitute a different font on your custom lettering order and you won’t notice? I clearly specified (and provided) Apple’s SF Pro Display font and even a PDF of the expected product. But they substituted Helvetica for it because “that’s an Apple font.” So they had to redo the job.

In the end, the eight die-cut vinyl labels cost $50.30, and they’ll be pretty easy to apply. The font, spacing and scale now match that of iOS 10’s home screens on iPhone 6, relative to my porthole window “icons.”

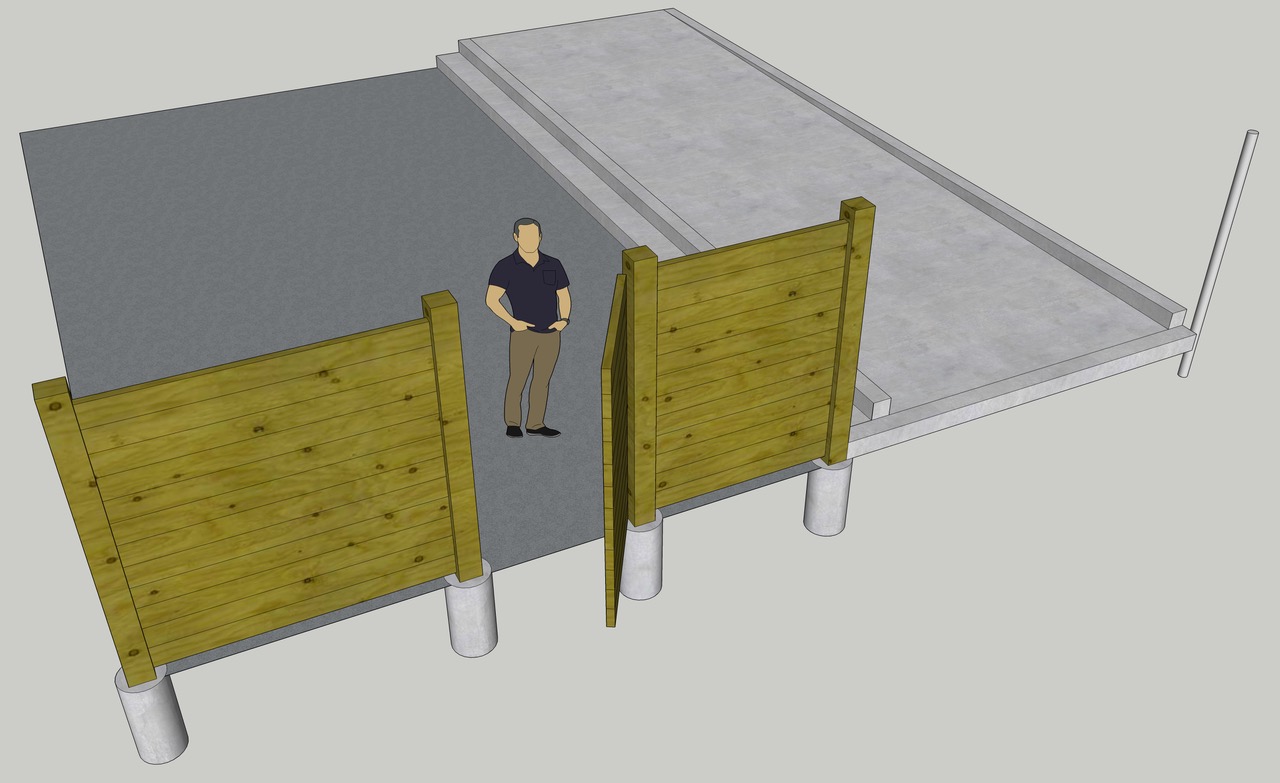
Yesterday Gary and I finished cutting, gluing and stringing the conduits and risers that will bring power, data and water to the pedestal. Today I picked up the rest of the 6×6″ timber and 2-3/8″ steel posts we need for the patio and gate. So this evening we’ll set the corner timber posts in concrete, in preparation for forming the curbs and steps this weekend. We’ll set the RETROpad’s front gate post next to the corner at the same time, since it needs to share the same hole and concrete. We won’t be ready to pour the curbs until after Labor Day now. But today’s the coolest day of the week so we plan to make the best of it before temps soar to 100° again.

Made Nice

This morning over coffee, toast and homemade jam on the front porch, Olivia and I came up with two sets of textual labels that I’ll apply as decals under each porthole window. The labels are ostensibly descriptors for my software business’ goods and services.

These are part of my iOS “dock” theme, as the four porthole windows are designed and grouped to resemble app icons on the iPhone’s home screens. The die-cut decals will use Apple’s San Francisco font, of course.

The starboard side will describe my objective attributes:

Mobile     Architect     Designer     Engineer

While the port side describes my subjective qualities:

Nimble     Intuitive     Creative     Efficient

Who wouldn’t want to hire that person? The label groups also form interesting acronyms for those of you who are lexically adept. 🙂

We next proceeded to hang panel T7, in the aft ceiling cavity. This was pretty challenging because there wasn’t a very good foothold and it was hard to drill through the steel rear frame without proper leverage. But we got it done and it looks great. I just need to cut a hole for the rear door bolt so it’ll shut all the way.

Here’s the view from the cockpit. We won’t be doing much else today since it’s pushing 100° again here in Tigard. But last night we did enjoy watching some Batman and other retro TV in there during happy hour(s).

“You Con-du-it!”

Saturday was mostly about the RETROpad. Gary Jackson nearly got heatstroke doing all that trench-work, surveying and form-setting on a bad wrist. He’s a trooper and he loves these kinds of projects. And after two more trips to Home Depot we have all the conduit figured out, including all the fittings and good plans for gates, grading and drainage.

We have a 1″ PVC pipe for 30A electric service, a second  1″ PVC pipe for Ethernet and Coaxial cable, and a 3/4″ PVC sprinkler pipe for fresh water. Gary ran yellow pull strings through the electrical conduits to make my electrician’s job easier (and cheaper). We also learned that we can rent a Bobcat from Home Depot for $249 for a whole day. So we’ll likely do that next Saturday to move some dirt.

In the morning Olivia helped install the last four windows and they look amazing. They’re all tinted, so they let in just the right amount of light. She loves them! And the screens on the back doors allow for some nice breezes. I solved the “bad screw” problem by buying a new DeWalt bit set with an extender.

I also got my six-way bus bars installed for the LED lighting banks. I screwed them into the ceiling ribs after deciding where the switches will go. Those bus bars will provide each light with a dedicated 12V circuit, wired in parallel. Tomorrow we’ll install our first ceiling panel, over the T7 aft cavity. That one’s easy because it will only have my custom speaker cans attached to it. So I can use it to test out some rigid foam insulation up top.

I found some awesome grab bars with integrated shelves, quite by accident. These will go either on panel P2 next to the helm seat, or above the galley countertop. They’ll hold important items like a soap dispenser, remote controls or beer bottles.

As the end of the tax year looms, I’ve been researching the best way to cut and install my vinyl decals for business branding purposes. It looks like I’ll be using products made by VViViD. I can get matte black and white vinyl in 1′ by 5′ rolls, which would simplify my grid-based diagonal cuts for the clapboard logos:

I think I have a great design solution, so stay tuned…

Beast Mode

On Thursday I bit the bullet and went to “The Beast.”

This is what I should have been using all along. It was my Dad’s DeWalt 7.8 amp drill, and it made short work of the remaining 13 corner holes. It was a bit harder to control but at least it has a grip, variable speeds, and doesn’t overheat or have to be recharged. The trick is to lock your elbow up against your rib cage lest your shoulder gets ripped out of its socket.

I even avoided buying a new 6″ hole saw, which means one tool made it through 48 holes in 1/16″ aluminum. And that’s the equivalent of a 3″ block of aluminum in total. Not bad, Milwaukee Tool!

On Friday I aligned and jigsawed the last four interior holes and tomorrow morning we’ll install four windows in panels D3, D4, D5 and D6. And then, mercifully, I’ll be done with cutting windows. I’m surprised I have any teeth left after all that metallurgic gnashing.

The D3 panel is behind the galley base cabinet which is fashioned from a heavy stainless steel tool chest. So I’ll have to disassemble and move the galley’s wood cabinetry to get access to the lower half of it. And while I’m there, I might as well figure out my plumbing for the sink, faucet and water pump.

My six-terminal bus bars arrived today so now I have everything I need to pre-wire two banks of six LED lights in the ceiling cavities. That’s going to take forever because I have to cut, strip, crimp and heat-shrink dozens of ring terminals on 16 AWG wire.

This weekend is supposed to be 95° again so I don’t expect to get a lot done outside. But Gary will be here working on the RETROpad in all that heat. He’ll be burying PVC conduit, digging a trench for the northern curb, and building the forms to pour the concrete steps and curb. All while I sip iced tea and heckle him from under an umbrella. 🙂

Seriously, I’ll have to post a recap of the amazing timber-and-rock decks, stairs and hot tub platform Gary and I built in the back acre.

Oh, Screw It.

Nope, I’m not giving up. I just love the part where I finally get to drill and screw some wall panels into place, knowing that all the measuring and re-measuring, drilling and re-drilling, cutting and re-cutting, cursing and re-cursing — is all done and has paid off. I call it “buttoning up.”

Yep, I got the final two window holes cut on the passenger side, and without incident. I felt like I found a good groove and this phase is getting easier, if not tedious. It turns out my hole saw is still sharp enough. Maybe sharp enough to cut the remaining 16 corners on the driver’s side wall. But my DeWalt 20V drill and its batteries keep overheating from all the torque of spinning a 6″ metal tool. So each corner hole takes one battery and then a half hour to cool down and another half hour to recharge. But it does help me pace myself.

My neighbor Bob came over to hold the P3 and P4 windows in place while I put some temporary screws through their clamp rings. Those four side windows are designed to resemble app icons in the iPhone’s dock. They’ll each get a “title” decal (using the San Francisco iOS font) as part of my branding plan.

Here’s the passenger wall, dry-fitted. All done except for insulation and the final window seals. The 1/16″ aluminum wall panels are very sturdy and super easy to remove and reinstall, which I had to do a few times to achieve accurate fitting. The smudges and scratches will all buff out, of course. The corner cavities above these panels will get overlapped by their own panels with 90° bends.

The RETROpad (yep, that’s what I’m calling it) is progressing nicely. Gary came again yesterday and finished digging the utility trench from the house to the power station. The RETROvan will moor just on the other side of the big umbrella and the hops garden.

Here’s how the design is shaking out so far, looking from the front of our house. I have a paver and fencer coming to give bids soon.

Home Base

Yesterday, I rehired my friend Gary Jackson to help build the RETROvan’s home base. It will eventually move from the driveway to become an integral part of our patio and courtyard area, secured by front and rear gates.

The first step is to demolish our ugly fence and gate. This photo was taken from where the rig’s back doors will be. Gary will be building a 30’x11′ RV pad where that wood pile is.

Our current design direction is to basically build a section of road; a pair of concrete curbs filled with concrete, bordering the pad. That greatly simplifies our drainage plan. Gravity will channel water toward the main street. Depending on the cost, I’d love to run concrete all the way to the street like a real driveway. And then I can paint some white dotted lines ahead of the RETROvan and put up a Route 66 sign. 🙂

This was a major find today. It’s a Hatteras Marina Power Pedestal, made by EATON. I custom-ordered it with dual 30A/20A outlets, a digital kW meter, ethernet jack, coaxial cable jack and fresh water connection. The top is an amber LED light that runs off a photocell (dusk to dawn). The 30A outlet will face the rig’s side for shore power, and the 20A outlet will face the patio for running tools, lights, a hot tub, etc. The cost was $658, but it fits the RETROvan’s “space marine” theme to a tee. I won’t have it for two weeks so I had to postpone Frahler Electric until after Labor Day. But that gives Gary and me some extra time to dig the trench and run the conduits. It’s also important to get the RV pad’s concrete cured before the rainy season starts in Portland.

And oh yeah — yesterday’s eclipse was spectacular!

Absolutely Riveting

This weekend I got two side windows installed, making more progress than I expected a day ahead of Monday’s big eclipse. The windows are only dry-fitted in place for now but they look great.

I wound up using the hole saw only on the outside panel, and it’s getting dull — not to mention boring. The sides of each window are inset 1/8″ from the corners on purpose, since the main part of the window is bigger than the interior clamp ring. This makes for a tighter fit since I’m not shimming them in a solid wall. It also gives me a way to trim the opening with my jigsaw for any last-minute leveling or spacing adjustments.

Here’s how I lined up the inner and outer holes. I first mounted the inner wall panel over its cavity. Then from the outside, I used a carpenter’s square to mark eight reference dots at the corner of the square. These dots are on the backside of the wall panel. This technique worked great to find what are essentially perpendicular projection points.

There’s no better template than the clamp ring itself. I used my reference dots to extrapolate a 14″ rectangle, which I outlined in pencil. Then I centered the clamp ring inside that rectangle and got it level by eyeballing it from above. Any discrepancies were averaged out, erring on the side of caution. Measure twice, cut once… And finally, I traced the clamp ring with a blue Sharpie.

I cut the panels with a jigsaw, including the corners. I wasn’t sure I could make turns that tight, so you can see my test hole in the middle. This task was made easier by laying the panel face-down, which also prevented scratches on the surface that will be visible. Don’t be shy about popping in a fresh blade. There’s nothing worse than a dull tool. Okay, well, there are probably a few worse things… I used Frog Tape to keep the panel from sliding and to prevent chatter. My workbench is actually formed by the two dinette bases I pulled out of the RETROvan during this phase. 

Here’s a shot of Olivia (wife and organic gardener extraordinaire). She made some amazing cinnamon plum jam this weekend. Installing these windows is a two-person job, so I’m glad she makes time to hold the outer part of the window in place for me.

This is the view from panel P5 (passenger side, 5th cavity from the front). If you look closely, you can see my original rectangle on the outer wall. Those master reference lines are “the truth.” The top is exactly 2″ from the lateral frame member and the sides are 2″ from a rib. This is the defining wall cavity because it’s the smallest, at a width of 18″. So that basically determined the size of all the porthole windows: 14×14″. The two holes line up just fine, so we mounted the windows with a minimum number of screws for now.

I don’t like the screws that Motion Windows provided. They’re painted white and they require a square bit to drive them. I have a square bit but not one that’s long enough to clear the trim ring’s flange without marring it. And it’s one of those bits with a driver on both ends, so it won’t fit into my bit extender. It’s very frustrating when you get this far on a task only to be tripped up by non-standard tooling. Almost as bad, as soon as you drive a painted screw, the paint looks terrible. So, I’ll rectify this tomorrow at Home Depot, one way or another.

Probably the most gratifying part of this task was actually buttoning things up for a first look at the finished product. That is, screwing a few inner wall panels into position. Yes, I’m using coarse sheet metal screws (not rivets) because rivets can’t be easily removed. The wall panels are vertical, and they alternate in layers with a 1″ overlap exactly over the wall’s vertical ribs. So that means every 6″, I drilled a pilot hole through two panels and a rib, forming vertical seams that resemble the skin of an aircraft. I might double them up (every 3″) later just for grins.

The result is absolutely riveting if you ask me.

Porthole #1

Today I started off trying to install wall panel P2 because I thought it would be the easiest. It doesn’t have any windows or electrical behind it, and I only plan to mount the medicine/zombie ammo cabinet on it. But then we realized that cabinet needs to hang at the same height as the mirrored cabinet over the sink, on the opposite wall. And that mirror needs to be higher than the wall panel itself. Those cabinets need to hang from the ceiling corner panels, which haven’t been bent yet.

So, I switched gears and started removing some of the dry-fit on the starboard wall. All the cushions, the base cabinet and the wall panels that were just taped into position. Then I measured out the placements of the four porthole window cut-outs on that side.

And then I had an epiphany: After many sleepless nights trying to visualize how things may or may not play out, I reminded myself that many things in life ultimately may seem impossible, difficult, or not worth the effort up front. Until, that is, you bite the bullet and strike up a little determination and momentum. And it’s that momentum that will carry you through the most daunting of tasks.

I measured out the outer wall holes evenly spaced from the inside, after starting over at least three times. I based everything on the smallest wall cavity, and simplified all the offsets at 2″ using a carpenter’s square. Then I drilled 16 1/8″ pilot holes from the inside out. From the outside, all I had to do was verify they were all within 1/16″ of plumb from the nearest visual reference, which happens to be the rain gutter running along the top of the RETROvan. That tolerance ultimately doesn’t matter because I’ve learned the 6″ hole saw is pretty sloppy. And, that slop is readily covered up by the inner and outer window flanges, so it really doesn’t matter since the final fit of the windows are reasonably adjustable.

The trick is to not draw tangents directly on the rather ragged corner holes, but rather re-scribe them from the inside-out and adjust the jigsaw cuts to bring the supporting edges back into line. This is super important because when I re-measured the windows, I noticed the outer part is 1/8″ smaller than the inner trim ring. Motion Windows just assumes your walls are solid wood (or whatever material), and that you can just use a shim to compensate. That’s not going to work in my case. I need the inner and outer aluminum wall panels to support their fair share of the window assemblies in level fashion, without shimming.

Here’s the first porthole window, dry-fitted into position. There will be three more holes to its right. The inner wall panels haven’t been cut yet, and that’s the next challenge. Hopefully I can do that with some careful measurement transference and cutting on a flat surface over some scrap plywood. That, because I don’t have access to an NC plasma cutter. But, this part was easier than the back windows because there was no inner wall panel to bang against when cutting.

So everything now depends on reference points, and keeping the number of those reference points to a bare minimum. That means I’m securing each wall panel with only a single top corner screw for now. The rest of the screws can go in once I’m sure that whole panel is in alignment with its window and ready to commit.

Window #2

Yesterday I cut the port side back door window holes, and Olivia helped me install the window. Here’s how they look when dry-fitted:

We’re thinking it would be nice to find some small awnings to mount above them as fixtures.

This window took another five hours to cut, mostly because of how close the inner and outer wall panels are to each other. That, and because my 6″ Milwaukee Hole Dozer seems to be be wearing out after only 16 holes, now preferring to leave a groove rather than a clean, round hole. So with eight windows to go, that means I’ll need to buy four more hole saws at $40 a pop.

And here’s the view from inside the RETROvan. The windows provide much-needed natural light and ventilation. I have decided I’ll need to insert a 1-1/8″ wooden frame around these windows to keep the aluminum panels at a consistent distance apart.

It looks like I can install one window every two days, based on how my back aches after doing this up on a wobbly ladder. But I’m hoping the side windows will be easier because I won’t have the wall-thickness problem. But I will have a different problem: The fact that the inner wall panels have to align across a 3-1/4″ wall cavity, leaving little room for error. But at least I can cut them flat on a table before screwing them in place.

Woohoo!

Yesterday Olivia helped me tighten all the bolts on the driver seat and passenger seat. That, after yet another trip to Home Depot to get the ideal combination of bolts, lock washers, fender washers and nuts. Not all of them could be the same combo because under the deck, the bolt holes had to dodge various steel frame elements.

But the result is good, and both seats feel solid. And hey — the driver seat is actually centered on the steering wheel now! Both International Harvester tractors seats are fully adjustable and they swivel, so even the driver seat can be part of the party. And that means the RETROvan seats eight comfortably. Nine, if you count Mazy in her bed on the front desk.

So today I’m marking, drilling and cutting out my first 24×24″ window hole in the starboard back door. The windows are premium quality. They’re dual-paned, tinted glass, with symmetrical locking sliders and removable, sliding screens. Wish me luck…

The first problem was with the 6″ hole saw and centrifugal force. It’s intimidating enough on its own, but once I spun it up with my DeWalt drill there’s way too much kickback when the drill stops suddenly. That drill doesn’t spin down gracefully; it’s either on or off at full speed. I didn’t feel I should risk scraping the surrounding wall whenever I let go of the trigger. So I switched to my cheaper, slower Black + Decker drill and had marginal success. However, it’s underpowered and too slow, and starts to bind and heat up quickly. And then it finally died so I was forced to buckle up with the DeWalt anyway. The trick was to lock my shoulders and right elbow tightly against my body. Not easy when you’re up on a ladder, too.

The next problem was that the back door cavities are barely 1-1/8″ deep between the inner and outer panels, and my jigsaw cuts to a 1-1/4″ depth. And that means a lot of chatter and kick-back. So my solution was to jam some landscape spikes between the panels to spread them out a bit, along each cut line. This worked, but it was still slow going. This must mean that the side windows will be easier.

It took all afternoon and several batteries, but I managed to get both holes cut through the door. The corners are more ragged than I expected but they’re covered nicely by the window trim on both sides.

Olivia helped do the dry-fit, which was pretty easy. And she approves of the window style and placement. Just one window dramatically changes the RETROvan experience. Next I’ll need to determine whether these windows need an interior frame to keep the aluminum panels spread out to a full 1-1/8″, because they’re pretty wavy. The final fit will include closed-cell foam tape and exterior Dicor sealant around the flanges.

Only 72 more corner holes, 72 more side cuts, and 9 windows to go! Woohoo.