Rewiring

I started researching what it would take to rewire the RETROvan’s cockpit, starting at the rat’s nest called an instrument panel. You may recall that the previous owner had the cab painted an off-white, but the painter didn’t remove or mask everything—namely all the wires and hoses.

Ford’s original wiring diagram is only of limited value because it doesn’t show the actual panel that’s in my rig. But the basics are there and it looks like most of the components are easy accessible in the chassis. It would just take a long time to get this right.

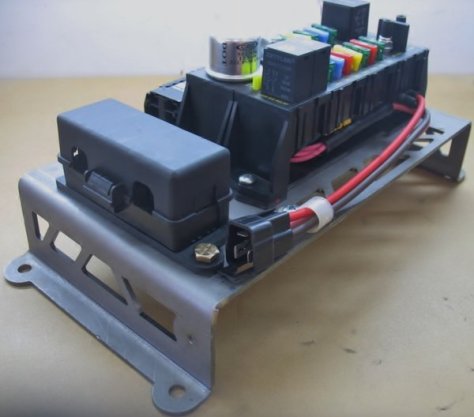
But I did find a fairly universal aftermarket kit that might just work. This one includes a fuse panel for added convenience and safety. It’s made by American Autowire as the Highway 22 kit, for around $422.

So my general plan for Phase 3 is to remove all the steel cockpit panels I can, disassemble the instrument panel, strip and paint everything, put it all back together and then rewire everything clean, using the proper color-coding. I just haven’t decided whether this is a DIY job or one for an automotive electrician.

Here’s a cool fuse block bracket made by HPI Customs for $65.

All the front windows and seals will need replacement too. But that’s a job for any auto glass company.

I also lucked out today and found the 3/4″ drain hose I need for the galley sink. I bought six feet at $2.59 per foot at West Marine. So soon I’ll tear out the galley one last time to finish connecting the water tank, pump, faucet and drain.

Need a new gas pedal, too.

Features

Just realized I haven’t really put together a comprehensive feature list for the RETROvan. So here’s a start:

  • 12V deep-cycle battery bank (2 @ 6V, in series)
  • 12V outlets (2)
  • 120V outlets (8)
  • 120V power strips (2)
  • 2000W AC/DC inverter
  • A/V jacks in wall
  • Aluminum cladding
  • Apple TV with AirPlay & game pad
  • Automatic vents with rain sensors (2)
  • Biometric safe
  • Built-in storage cubbies (~20 cubic feet)
  • CarPlay A/V receiver
  • Coffee maker
  • Curio shelves (powered)
  • Custom 2-way speaker enclosures (4)
  • Custom dinette/berth cushions
  • Custom cabinetry (lacquered maple & stainless steel)
  • Custom pontoon helm
  • Custom receiver enclosure (acrylic)
  • Custom RV pad (gated & secured)
  • Custom windows (10)
  • Dehumidifier
  • Dinette table (on telescoping pedestal)
  • Dual ovens (microwave & convection)
  • Fresh water tank & pump (11 gallons)
  • Galley sink
  • Gigabit Ethernet (via shore pedestal)
  • HDTV (19″)
  • HDTV antenna (powered)
  • iMac (5K, 27″)
  • Insulation (R-13.1)
  • iPad Pro integration on helm
  • Insteon SmartHome integration
  • Lava Lamp with Bluetooth speaker
  • LED accent lighting throughout (USB)
  • LED overhead lights (12)
  • Marine navigation compass
  • Marine control panels (with custom wiring/labeling)
  • Marine plywood subflooring
  • Medicine cabinets (2)
  • Music keyboard controller
  • Nest carbon monoxide & smoke detector
  • Radio scanner
  • Recording studio equipment
  • Refrigerator/freezer (with real compressor)
  • Rubber “puzzle-tile” flooring
  • Sci-Fi collectibles on display
  • Security systems
  • Shore power pedestal
  • Solar panels (4 @ 100W)
  • Space heater (oil-filled)
  • Space heater (with LED fireplace)
  • Television ceiling mount (motorized)
  • Tractor seats on telescoping pedestals (2)
  • USB outlets (10)
  • Wall-mount faucet
  • Weather station
  • Wi-Fi hotspot

What’s with all the Diorama?

I’m enjoying a bit more classic sci-fi geekery, so indulge me.

This is a 7″ Godzilla from the old Japanese series, circa 1968. Not the original 1954 Gojira version, mind you. But the one we got in America. You apparently can’t buy these new in the US. They have to be imported from Japan due to licensing restrictions. But even with shipping, it was just $15.30. He’ll sit somewhere up on the RETROvan’s dash in lieu of some Bobblehead Jesus when he lumbers ashore next month. I was around six when my cousins and I first saw Godzilla on late-night TV in glorious B&W. It terrified us and gaslit our imaginations. It later taught me that all you need is a rubber suit, a few models to smash, some campy music and a camera to tell a fantastic story.

This $22.74 scene is from the Devil in the Dark episode of Star Trek (the original series). That’s Spock of course, about to mind-meld with a creature of silicon origin that has a penchant for mining and protecting its young. It’s a classic episode about how humans can be an invasive species. But Mother Horta will always remind me of leftover pizza. So this diorama will sit next to my RETROwave oven.

And this $17.47 scene depicts Captain Kirk fighting Kahn, played impeccably by Ricardo Montalban. The episode was called Space Seed. This one is less interesting to me but for the price I had to get Kirk, who can be posed next to Spock instead. This affordable collection is mass-produced by Diamond Select, and more scenes will follow. And once discontinued, each issue can increase tenfold in value to Trekkies.

These two scenes will balance out my Batman and Robin pieces and I’ll be done with both shows, covering my two childhood favorites.

I do have other little displays in mind wherever they’ll fit. For example, any nice 4-inch collection that would fit along on the RETROvan’s photo ledge shelves behind the LED light strips. There is a nice one from Toy Story but while I’m big into Pixar I can’t quite pull the trigger until I shop some more. Another possibility is a long WWII submarine model that would nestle up there. One of my favorite sub movies was 1958’s Run Silent, Run Deep. Or it could be a line of stormtroopers goose-stepping behind Darth Vader. We’ll see…

And finally, my RETROpods were looking a bit naked so I designed some decals and had them die-cut at Signs Now in Tigard. And man, they sound better now! I’ve got the EQ and fader dialed in, rocking out to The Grand Illusion by Styx right now and it sounds like the recording studio itself.

RETROfun!

Today I installed two LED light strips on the lips of the aft ledge shelves. This is nice because I don’t lose any shelf space, and they’ll illuminate any objets d’art I put up there, like crystal or glassware.

They also reflect off the ceiling, creating a Northern Lights effect. Or I can simulate red-out conditions at night, like in a submarine.

These were only $9 each and they include an inline USB controller. The lights change colors and can blink or animate in patterns. The strips have an adhesive backing and can be cut to length.

I also ordered this “modern retro” Lava Lite sold by Sharper Image. I always had a Lava Lite in my bedroom growing up, and this one reminds me of some Star Trek props. It’ll likely go on the galley, next to the coffee maker. It features a Bluetooth speaker, so I can pump ambient audio loops to it from the iPad on the helm. That audio would be independent of any movie or TV show I might be watching.

“Nomad” from Star Trek – The Changeling

RETROfun!

All Revved Up, No Place To Go

Today I got busy replacing my ignition switch and key cylinder. Because last month, I had set aside my lone RETROvan key for duplication and then promptly lost it.

I first ordered a replacement cylinder (only) but I couldn’t get the old one out of the switch because it was a slightly older design. Then I ordered a complete switch with a cylinder after finding the original Ford part for a 1961 P-400. But that one was completely different and didn’t fit the instrument panel. (I’m keeping it just in case.) So I finally figured out the rig didn’t have the original part, it had a universal Calterm part that may have been swapped in sometime later.So I ordered that since it looked the same. And you can see it comes with two matching keys.

Step One was to disconnect the starter battery. This involved simply lifting off my floor’s rubber puzzle tiles, removing my marine plywood hatch, then removing the steel diamond floor plate to access the battery shelf. Then I disconnected the Negative terminal.

Here’s the old ignition switch, which I removed from the instrument panel. Note that the instrument panel and all of its wiring hasn’t been restored yet. That’s an epic task for later this year, as part of Phase 3.

Taking careful note of the wiring on the old switch’s four terminal posts, I began transferring each group to the new switch.

And finally, I mounted the new switch into position through its hole. Then I noticed the nut you can see here is not the same as the original. It’s plastic—not metal, and it’s smaller. And worse, it doesn’t hold the switch as securely. So I’m not happy about that, considering that the photo on Amazon clearly showed a matching metal nut. But even my old nut doesn’t fit onto this switch’s threads. So, I’ll be following up with Amazon and Calterm to complain about false advertising.

But the good news for now is, the RETROvan started right up and the old Ford 3.6-liter 223-cubic inch inline six cylinder engine is now purring like a kitten on steroids.

Let There Be Music

Over the past two days I did the unthinkable. I tore open much of the driver side wall, top panels and berth base to run two new cables. One for left and right audio, and one for composite video. I plan to use the video cable later for my back-up camera, but I need the audio upgrade now.

This is the top corner panel behind the galley cabinet, which I had to disassemble. The dark gray cable up top is channeled through a pre-existing hole in the steel braces my Dad and I added. That way I avoided weakening those supports by drilling extra holes in or around them.

Here’s the audio cable, made by MediaBridge. This particular run is 25 feet long. I started by clipping off the 3.5mm Auxiliary jack and threaded that end of the cable from front to back through a total of four 3/8″ holes. I would later thread the separate (and thinner) video cable along the same route. This is all good because it keeps these signal-sensitive cables away from the noisier 120V and 12V power cables, while also protecting their insulated jackets from the heat of the aluminum roof.

Here’s the route they would eventually run, back to wall panel D6, just below RETROpod 3.

Here’s how they’ll terminate at the aft wall panel. This is a Leviton Decora QuickPort system, which I’ve used elsewhere in the RETROvan. The black versions have to be custom-ordered. The RCA jack modules snap into place after the wires are terminated into them. These jacks are not the simpler “pass-through” variety. That is, you can’t just plug an RCA cable into both sides of the jack. And that’s okay because an RCA jack is too big to snake through my routing holes.

The rear wires have to be crimped into the proper terminal slots, using the blue 110 Punch-Down tool you see on the right. That tool’s tip has a U-shaped “puncher” that pushes the wire into place. And then a small blade on one side of the tip trims the excess wire off. It took me a while to figure this out because I’ve never done this before and there are no instructions. You can find videos on YouTube but they tend to be geared for Cat5 (network) installations.

Here you can see the electrical box mounted through the wall panel and the 120V (with USB) outlet is wired up to the spare branch circuit I had the prescience to run months ago. The cables are stripped to reveal their inner conductors, which are still insulated at this point. In fact, the way the punch-down thing works, you don’t strip the wires yourself. You let the terminal blades slice through the insulation for you.

The thin black cable under my thumb is the video cable. It contains three wires: Yellow for video, Red for power, and Black for ground. Pretty straightforward.

The thicker dark gray cable is much trickier. As it turns out, the Red wire is the Right audio line. The Orange wire is the Left audio line—which should be White. And the frayed copper you see is the Ground. Apparently in this type of audio cable, the ground is common between both channels. And it is braided around the signal conductors to help shield them from outside RF interference.

The next challenge was to terminate the jacks and test them out. As you can see, this looks like a mess. I had to separate the ground wires and twist them into something resembling a single wire, one for each jack. There is potential here for a short or a loose wire. But at least the jacks would be easily accessible from the wall panel now. I just wish the ground had two separately insulated wires.

In this photo I’m holding the video cable up. That one was much easier to punch down into the Yellow jack, given that its Red power wire is unneeded for now.

And here it is all buttoned up. Works like a charm. And now, I can finally connect my iMac’s headphone jack to these wall jacks. And the sound comes out all four RETROpods in real time. No more Bluetooth lag. And that’s vital when working on music production with a MIDI keyboard.And as you may recall, I overcame the hideous Ground Loop Noise problem by using this gadget on my iMac’s headphone jack.

Ground Loop

I’ve been pulling my hair out, trying to piece together an even cleaner way to integrate various A/V components in the RETROvan.

My plan involves installing a second dual-gang outlet box on aft rear wall panel D6 using two USB-enabled 120V outlets and a pair of RCA audio jacks. This also involved carefully researching and purchasing three new cables and Leviton QuickPort modules. Those cables have to be the right lengths, they have to have the right connectors—and most importantly they have to be adequately shielded against RF interference.

The goal is to be able to connect my 5K iMac to the wall, and then to my AppRadio 4 receiver via the receiver’s AV input jacks, which are male RCA plugs. This direct connection would essentially eliminate any latency when playing music from my AKAI MIDI Controller keyboard, via Apple’s Logic Pro X DAW (Digital Audio Workstation). If connected merely by Bluetooth audio, you press a key and then hear the sound a half second later. And that’s not ideal. Normally this isn’t a problem because most of the time, you’re consuming A/V content not in realtime, but on a timeline that is kept in sync by your Mac and its operating system.

What I didn’t anticipate is something called “ground loop” interference. This manifests as a loud, low-pitched humming or buzzing noise playing through your speakers. This can happen when the components of your audio systems are connected to different power sources and/or at different voltages. There may be other causes, such as running an audio cable next to a power line, but that’s not a concern here.

In my case, my AppRadio is powered directly by a 12V circuit because it’s essentially a car radio. But my iMac is powered by a 120V wall outlet, fed from my ProMariner inverter. And apparently, the iMac’s headphone jack is not properly isolated or shielded. I know this because I can plug my new cable into the headphone jack of my TV or iPhone and the sound is crystal clear.


So next I tried a little gadget branded by Sabrent. It’s a USB Audio Adapter that plugs into your iMac and then you plug a 3.5mm headphone cable into the gadget. The assumption is that surely the iMac can produce digital audio that bypasses its own ground circuitry.

Same problem. Nothing but loud humming/buzzing noise. Apparently the iMac’s USB bus is still plagued by this design defect, and somehow that signal makes its way into any external analog jack no matter how far downstream it is. So next I tried isolating the problem with my favorite ThinkGeek external USB hub:

Same problem. I could try using a self-powered USB hub, but I’d still have to plug that into my 120V power so I don’t think it’s worth buying one.I eventually discovered this little device. It’s an inline Ground Loop Noise Isolator. I get it on Tuesday and can test things again then. My concern is that it’s basically a filter. So the question is, what other frequencies will it step on?