The Heart Transplant

Today was the day. It took Brett from McFarland’s Mobile Mechanics six hours to remove the patient’s still-beating heart with his bare hands (and a cherry picker).

This process was complicated by the fact that several bolts and two steel panels were rusted together and had to be cut. But at least now I have most of the cockpit panels off, where I can strip and repaint them, and replace any rubber seals. When it’s all done, all the bolts will be shiny new and stainless steel.

The damage for today: $729.34, including transport. And yes, I started a ledger to keep any eye on my investment.

Brett’s tow truck guy delivered it to Portland Engine Rebuilders where Ron took my $500 deposit and put it on his schedule.

We discussed the option to find a rebuilt Ford 292 Y-Block but I decided to just rebuild the original 223 after weighing all the pros and cons. It would mate to the existing transmission. But the extra horsepower would only make a difference in uphill speed at the expense of fuel economy. And it would basically double the cost of this retrofit to change all the mounts, the exhaust system and so on. It would also be a larger engine, which would make it harder to access for maintenance.

So, the rebuild is expected to take three weeks, which is pretty amazing. And the purist in me likes the idea of just restoring the original configuration — at least for the cabin and chassis. There will be plenty of custom add-ons so the size of the engine ultimately isn’t that important as long as it’s reliable.

Before re-installing the rebuilt engine, I’ll have to round up the following parts:

  • New starter (because the recently installed one has a broken tab)
  • New flex plate (because it’s missing a mount ear)
  • New fuel pump (because the bottom gasket is leaking)
  • New fuel filter and 1-foot hose
  • New oil filter
  • New oil coolant thermostat (because you should always replace it)
  • 5/8-inch heater hoses (because some chimp spray-painted them)

Fortunately Brett gave me the names of a few local NAPA old-timers who specialize in finding the right Ford parts, so I’m not too worried… yet.

Bubble Dome Skylight?

I’m still exploring the concept of a submarine theme. Specifically, this:

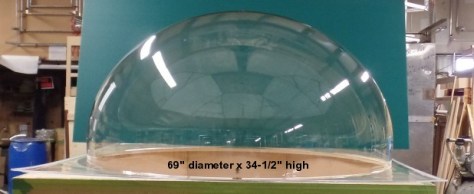
Note how the front windows are similar to my rig’s. But of course, the most notable feature is that crow’s nest bubble dome. I found a place that vacuum-forms domed skylights out of acrylic for a few hundred bucks. You can order them in any size and thickness, and they look like this:

Such a dome could be mounted (and carefully sealed) over my cockpit. A 36-inch diameter would increase my overall vehicle height by 18 inches. So that means staying very aware about low-hanging obstacles when driving around. Most gas station canopies are tall enough for bigger RVs, so I’m not overly concerned. An air conditioning unit will add some height anyway, but not as much.

From the inside, we’d have a great view of the trees and stars. Taller folks would have a comfortable place to stand and a step stool would afford some good 360° observation in case of zombie and/or hipster attacks.

Thoughts?

Engine Rebuild

Today I had Brett from McFarland’s Mobile Mechanics come out and diagnose my engine. And sure enough, it was a rod knocking. So that means it’s time to rebuild the engine. The house call cost me $85 but it was very informative.

The good news is, Brett can pull the engine on-site with their cherry picker and deliver it in long-block form to Portland Engine Rebuilders next week. It will come out the side door, after taking off a few steel panels around the engine compartment. That’s okay, because I need to strip and repaint the cockpit anyway, one panel at a time.

Brett recommended keeping the Ford 223 Six engine (versus upgrading to a bigger one) because it’s original, notoriously reliable, and easy to work on. Plus, it mates to a known-good transmission and there’s no compelling reason to swap that out to handle a bigger engine. He said my cruising speed would still top out at 55 mph anyway. He actually owned a 223 in his F-100 so he’s got first-hand experience. He did suggest adding an electronic ignition kit for around $100, which sounds like a no-brainer. No sense in worrying about adjusting points if I don’t have to.

So I made the arrangements for next Wednesday. It will take four or five hours to remove at $107 per hour, and then Brett will deliver the engine to PER where Ron will take it and completely rebuild everything inside the core for a flat $2,122. That process will take three or four weeks, but they have the state-of-the-art machinery necessary and they’re experts in these old engines. Meanwhile, the van will still be in my driveway where I can continue working on the inside. And that’s an ideal scenario if I want to be driving it by summer.

Brett’s eyes got huge when he first saw the rig. He couldn’t believe I found one in such good shape. Most of them are completely rusted out or scrapped for parts. He said he thought it was easily worth $10K in its current state. So that made my day, and eased the blow of these inevitable engine-repair expenses. I had budgeted $4K total for that work and so far, so good.

Insulation Plan

I took a peek inside a small wall panel and found dirty fiberglass insulation. The cavity appears to be about 2-3/4 inches deep, so that’s plenty of space to replace with a modern line of foam insulation board like this:

Owens Corning FOAMULAR comes in various thicknesses: 1/2″, 3/4″, 1″, 1-1/2″, 2″ and 3″. The R-value ranges accordingly from R3 to R15. By comparison, a typical 4-inch wall cavity in your home is insulated with R-15 fiberglass, which implies that foam board is 25% more effective and probably easier to apply to square surfaces. For 4’x8′ sheets at Home Depot, the cost ranges from $19 to $29 for each 32 square feet. And that means even with waste, this step will afford good bang for the buck.

I went to Home Depot today and found a different brand that is made of styrofoam and includes a thick layer of aluminum foil. Not sure which would be better now, but a reflective thermal barrier seems like an upgrade.

For the Scenario Mobile, it’s as much about acoustics as thermal comfort. So the walls will probably get 2-inch foam while the floor and ceiling might only get 1/2 inch. That’s to maximize headroom. As-is, I only have 6’1″ of clearance from floor to ceiling. But the ceiling appears to also have a 2-3/4 inch cavity, which gives me some hope that I can  do this without losing any height. My son is 6’1″ and it’s going to be awkward if he has to hunch over. If I can reduce the ceiling cavity to one inch or so (even in pockets), that’s a major win because i can put in a new hardwood subfloor.

So I’m thinking the process will go something like this:

  1. Pop all the rivet heads with a hammer and chisel and remove all the aluminum interior panels. I’ll number them in case I want to reuse them later.
  2. Clean out the old insulation and dispose of it properly.
  3. Clean out the bare frame rib cavities.
  4. Figure out my finished wall depth and measure out all the frame ribs to sanity-check my Window Plan.
  5. Patch all holes with aluminum tape. Even a small hole under the floor can allow water to spray in while driving.
  6. Apply a vapor barrier to the whole thing. I need to research options there.
  7. Figure out where to run electrical conduit so that I can snake wires easily.
  8. Cut and adhere the foam insulation boards with construction adhesive.
  9. Join all the seams with aluminum tape.

And hopefully, that will create an airtight and watertight box ready for cladding. I’m imagining black-and-white checkerboard vinyl on the floor, loop pile carpet on the walls for sound absorption, and quilted aluminum on the ceiling for that retro diner motif.

What did I miss? Oh, yeah, the ceiling. We’ll need low-profile LED lights, skylight vents and an air conditioning unit. More on that later…


Window Plan

I’ve decided the Scenario Mobile should sport a row of four smallish windows on each side centered above the rear wheels, resembling portholes on a jet or submarine. Remember the Proteus sub from the 1966 sci-fi classic, Fantastic Voyage?

They will be 14-inch squares with 2.5-inch radius corners to mimic app icons in the iOS dock on iPhones and iPads. I’ll even label them with “app” title decals that reflect my professional services.

I can’t find any pre-fab windows meeting these specs, so they’ll need to be custom made by Motion Windows. They’re in Vancouver, WA so I can pick them up and save on shipping charges.

Here’s the hole-cutting template I worked out. This is based on a nine-inch grid to nestle each window between the two-inch frame ribs, which are spaced about 18 inches apart on center.

I’ll cut the corners with a five-inch hole saw, and then cut the sides with a DeWalt jig-saw and/or angle grinder. There will be no room for error. The windows will clamp in place, made watertight with gaskets on the outside and inside.

The critical dimension here is my finished wall depth. So that means before I can order them I need to remove a few interior panels to expose the ribs, and then decide on how thick my wall sandwiches will be, including the insulation. I’m guessing that depth will be around two inches.

I was quoted a cost of $248 per window, or $1,984 total and a lead time of six weeks. That may seem excessive considering larger off-the-shelf RV windows can be had for under $100. But these portholes would be the most distinguishing exterior features and make for a truly unique design element, completing the theme.

To keep the design clean, I don’t plan for these eight windows to open. I’ll add vents on the ceiling, and larger stock RV windows on the back doors and behind the entry door later.


De-branding

It took a full day to remove all of the branded vinyl decals, using a Wagner heat gun, a cheap plastic scraper and a can of 3M Adhesive Cleaner. If you ever have to remove decals, don’t waste your money on Goo Gone, Goof Off or Oops. Go right for the industrial solvents or you’ll spend all day picking, rubbing and cursing. Even the 3M product takes more effort than it should, but that could be because it’s only 50° out.

Ah, there. Much better. We couldn’t believe how good the paint job is. (It must have extra lead in it!) The big photo decals can linger a while. My wife likes them, and she’s the world’s best baker.

Gutting, DMV & Design

It took a few hours to gut the cargo area completely, leaving only a box clad in riveted aluminum panels that would look like an Airstream once polished up. That’s where the diner-style booth and table will go, along with a six-foot kitchenette and passenger captain chair.

I went to the DMV and got my title and registration. I convinced the clerk that I’m converting a commercial vehicle to a passenger van, so I was able to get the custom license plates I wanted. Fortunately, no inspection is required for vehicles older than 1975.

I also spoke to a mechanic in Sherwood about engine and front-end options. He estimated $8K to $10K over three to four months. But he works alone and his shop seems too small for the job.

Then I stopped by a place called Van Specialties only to learn they’re booked out 18 months, and they want $1K just to get on the wait list. No thanks.

They gave me a referral to a company called RC Display Vans in Portland. They specialize in custom “display” vans for marketing. They do not, however, specialize in replying to emails.

I’m spending most evenings exploring design ideas in SketchUp:

This is one of our design inspirations:

Scenario Mobile

I’m now the proud owner of a beautiful 1961 Ford P-400 Parcel Delivery Van. These beasts were known as “bread trucks,” because so many were used by bakeries. Today they’re known as “widowmakers” because they’re, well, dangerous to drive.

I plan to convert mine into a mobile home office, branded for my mobile software development business. That way it qualifies as a tax deduction under marketing expenses. It’ll mostly sit at home under shore power with an occasional client visit, coding session at the beach, or vintage car show.

The van was owned by the House of Bread in Tigard, Oregon. Quite by accident, I got word that they were going out of business so I inquired about their parking-lot ornament. Two sleepless nights and a harrowing test drive later, I traded a cool $4,444 for the title.

The 56-year-old body and Pantone 201 “maroon” paint are in great shape as you can see. The engine, however, needs to be rebuilt or replaced because it clanks like hell. It’s the original Ford 223 Six, mated to the 3-speed Cruise-O-Matic transmission. This transmission was an original Ford upgrade, and bonus — it was recently rebuilt. The odometer shows ~42K, which means 142K or possibly 242K. If the latter, that would be farther than the moon.

I’m thinking about having a bigger Ford engine (their old 292 V-8) dropped in, and the front-end swapped out for struts. Hopefully all for less than $7K. But I don’t know whether that would require a transmission change as well.

The cabin (which I’ll call the cockpit) needs a lot of work. It was basically painted by a chimp with a spray can. That’s one of my biggest pet peeves: Painters who are too lazy to mask or remove hardware that shouldn’t be painted. The cargo area, however, is potentially a blank canvas totaling 72 square feet (or 438 cubic feet). It has some broken shelves and a giant wooden sled that pulls out on ball bearings to service the local Farmers Markets.

While I built hundreds of models as a kid, I’ve never restored or customized a real vehicle. But what can possibly go wrong, right? I’ll update this as the project progresses, so stay tuned!