Aluminum Paneling


I picked up my first batch of 19 aluminum panels today. One of them had to be cut into a trapezoidal shape while I was there, so I got to see metalsupermarkets.com‘s 10-foot shear in action.

I had made one simple request to the shop: Don’t write on the panels. Use masking tape. But what did they do? They wrote on them with black Sharpie. So now I get to spend hours removing the labels.

I then dry-fitted the panels into position using only a piece of Frog Tape along the top. This revealed that the shop made one mistake and I made a second, so those panels will be recut next week.

The panels are individually measured to cover each rib cavity within 1/16″, and with a 1-inch overlap. Those overlaps will be drilled and screwed into the aluminum Z-channel and C-channel ribs.

I haven’t decided whether to have them powder coated or not. We kind of like the clean sheen as-is, and it doesn’t seem to reflect that much heat. It reminds me of the classic Airstream.

The ceiling panels will be pretty tricky to hang, of course. I’ll need some help for that. They need to be precisely measured and cut out for vents and lighting as well.

I measured and ordered my second batch of panels for the upper corners. Those will be bent by a separate fabricator to 90 degrees, overlapping the wall and roof panels by the same one inch.

The metal cutter didn’t seem to understand that the panels they sell have a brushed “grain” to them. And I want the grain on the upper corner trim panels to match that of the walls and ceiling. So this took several attempts to communicate. That’s just one more thing they are liable to screw up (which they did).

Overall, this modular design makes everything easier to transport, handle, mount and unmount. That way if I need to fix some wiring or plumbing, I only have to unscrew a panel or two.

Wood Shop 101

It’s supposed to be 101° this weekend but my goal is to get all of my plywood cut in the garage. All those weeks of wood shop at Junior High School in Casper, Wyoming are paying off.

The biggest challenge is learning how to do clean cross-cuts on large workpieces without the luxury of a big cabinetry workshop. My table saw isn’t big enough and I don’t like using circular saws for that because they’re cumbersome. And even the best radial arm miter saws only have a 16″ reach.

So, I’ve become best friends with my jig saw followed up by some orbital sanding. And that seems to be working fine, even on the long angle cuts on my counter top and bulkhead.

To center the sink over the cabinet door, I first positioned the countertop and then traced the tool chest’s top opening from the inside. That was important because there are brackets in there to secure the countertop to the metal frame. This gave me a “safe zone” within which to center the sink so that the back and side margins are the same distance.

The wooden cabinet’s left wall will stand up just to the right of the sink. The faucet will be wall mounted behind the galley, with the water supply line and drain snaking through the wall to belowdecks. That way the plumbing is minimized inside the cabinet, thus maximizing usable storage space. Not sure where the water pump will go, but there are plenty of options.

And no, the RETROvan will not have a toilet. Eew!

I spent the rest of the day cutting all the pieces I could from eleven sheets of 24″ plywood. When I know pieces will become small enough to trim on the table saw, I just rough cut them a little bit large so they can be cut to dimension against a fence. That’s working great for prominent pieces that are around 24×18″, like the galley shelves and top.

Most of the plywood came with dinged corners, so those had to be squared off, first. That that was a major pain considering how they were individually packaged to prevent such damage. I’m guessing there’s careless handling at the mill before packaging.

The bench bases are taking shape. They have to be cut conservatively because nothing is really square in the RETROvan, like those wheel well boxes. They also have rivets and other bumpage to measure around.

I’m using my adjustable pedestal as my reference height. Here you can see it in the fully-down (berth) position. It too will mount atop a 3/4″ plywood floor in the middle of the van. The bench bases will have 3/4″ plywood tops, and the pedestal table/berth platform will also be 3/4″ plywood. So in the berth position, the top surfaces will be level and the cushions will simply span across, forming a flat queen bed.

Note also how much storage I’ll have in these boxes. The back compartments are each 2×2 feet (4 cubic feet), big enough to store a barbecue grill or form a battery compartment. The front L-shaped compartments are 3 feet long. They’ll all be accessible via hinged doors. I’m leaving some room on the back ledge to accommodate any handles, to get a foothold, or to set a drink down from the outside.


Up on a Pedestal

I finally pulled the trigger on a pedestal that will help convert my back dinette table to a queen bed. Because, you can’t have a mobile home office without a comfy place to stretch out and take a power nap. Right?

This one is made by Garelick and runs $712.94 on Amazon.com. It’s an aluminum three-stage device with a gas (pneumatic) assist and stainless steel hand (not plastic) ring clamps. It ranges in height from 12-3/4″ to 28″, which is as good as it gets without drilling a big hole in your floor so the post can travel under deck. That may work for boats, but not necessarily for land yachts.

This means my bench boxes now need to be 3/4″ taller so that the cushions will all be at the same level. Fortunately I haven’t cut them yet and have enough slack in my stock to make those adjustments.

But this also made me rethink my floor levels and I realized (too late) that my galley countertop was also going to fall 3/4″ shy of my 36″ target height, which is the standard ergonomic metric for counter height. But I lucked out again, because I have enough waste plywood from my first round of cuts to remake those five vertical pieces.

What’s the old saying? “Measure twice, cut once?” Well, that only works if your assumptions are right the first time around.

Basically, the entire RETROvan will have a 3/4″ plywood floor behind the cockpit. But the three base boxes I’m building will have their sections of the floor built-in, for modularity purposes. So in the case of this table pedestal, if the minimum height is 12-3/4″ from the top of the floor to the bottom of its table’s plywood, that means the bottoms of the middle cushions will rest at 13-1/2″ above floor level. Therefore the bench boxes must be a total of 14-1/4″ tall, including their section of flooring. My cushions are 6″ thick, but of course they’ll compress when you sit on them. So they should still come close to the standard 18″ back-of-knee height for seating. Perhaps even closer than before.

Here’s my amended cut plan, with “bad” cuts in red and “better” ones in yellow. This includes a new 24×48″ piece for the dinette/berth table:

Not a lot of waste, eh? By the way, the Garelick pedestal narrowly beat out this unique one made (and subsequently discontinued) by Springfield:

I liked this design better, but its range was shorter (12″ to 25″) and I had concerns about its mechanical stability, just looking at it. Plus, it was mysteriously cheaper and didn’t have any published reviews. Perhaps it just wasn’t a good product? As several contributors pointed out, the Garelick simply looks sturdier because the physical load is straight up-and-down. And that was the clincher, especially considering the RETROvan will be a rough ride once underway.

Oh! The folks at CushionSource.com sent me photos of a short prototype head rest today, and it’s looking great:

Cabinet Meetings

I spent yesterday starting on cabinetry for the galley and the bench/berths. Here’s just the galley:

And of course everything I do starts with a meticulous plan:

All of my wood stock is 3/4″ maple plywood, sanded nicely on both sides. This comes in 24″ widths and either 48″ or 96″ lengths, and all dimensions are actual — not nominal:

This stock is cabinet quality but not marine grade. In other words, the glue between the plies is water-resistant but not waterproof. However, it will technically be indoors and I’ll be sealing every surface with polyurethane anyway. So in theory, no humidity should get in or out of this wood when I’m done.

I’m going with gray on these pieces, since there’s plenty of black, white and red elsewhere. Two or three coats of this Varathane should do the trick, and I’ll be testing it on scraps first:

Update: This stuff sucks. I won’t be using it.

I bought a Diablo 80-tooth fine finish blade for my Craftsman table saw, and it cuts like butter. The only problem is the fence on my table saw. It has to be carefully calibrated for each cut in order to stay on line. Very frustrating.

Each piece will include its own solid base, which will later integrate flush with the rest of the RETROvan’s floor. I’m making things modular for structural strength, for maintenance purposes, and to provide a nice finished interior for each accessible storage space under the galley and the benches.

The top is not yet attached in this photo because the galley base isn’t sanded, stained and sealed yet. But if you look closely you can see a pair of pocket screw holes on the middle support piece.

The Kreg pocket screw jig system is amazing. I can’t imagine joining cabinet pieces any other way. Once I got that jig set up for a 3/4″ material thickness, everything started coming together quickly and professionally using Kreg’s #10 1-1/4 screws.

Shocking!

Today, Olivia and I “watched” a golf tournament and a Cubs baseball game all in cloudy weather on our covered front porch, all from solar and battery power. I guess that makes us officially off-gridders — at least for an afternoon.

The meter on the Renogy charge controller never dipped below 75% the whole time despite expectations to the contrary. Yes, this portable Sony Bravia TV is not drawing much wattage compared to a toaster oven. But at least that means three solar panels can adequately service a Sunday’s worth of football games even on a cloudy Portland day. And, I have a fourth solar panel arriving on Monday.

This test was perhaps the most stressful to date for the RETROvan. None of these components are made by the same company or guaranteed to work together other than in theory. The installation manuals for both the Renogy solar charger/controller and the ProMariner inverter/charger/transfer switch are negligently omissive. Neither product explains any interconnection steps or even acknowledges the fact that people might want to combine solar with shore power. And really now, who wouldn’t?

The other challenge is that the cable sizing, stripping, terminating and wrangling will drive even professional electricians crazy. In part because what’s in the manuals will not match what the companies tell you in person, nor what’s on the reference charts. That may be because everyone is so concerned about erring on the safe side, they keep compounding the problem. The cables between the inverter and battery bank are 2/0 AWG, which are nearly 3/4″ thick. And that just seems excessive to me, not to mention difficult to bend. The cables between the solar charger/controller and the batteries are 8 AWG, and the terminals on the Renogy component are terrible. You can’t really just screw them down and walk away, because as soon as the box moves, all of those connections come loose whether you’ve screwed down the bare stranded wires or terminated them in ferrules or butt connectors. Also, I had to search for a stripper that would even come close to handling 8 AWG cable, because every retail tool tops out at 10 AWG.I finally found a nice Klein Katapult device at Home Depot that cuts and strips individual conductors in a single step, up to 8 or 10 AWG depending on whether the wire is solid or stranded. But that’s still after taking five minutes to remove the outer sheathing with a box cutter. If you’ve ever wondered why electricians are so expensive, the menial labor is why.

So, while this test was successful I’m less than 100% confident in my cable choices and terminations for a permanent installation despite getting recommendations from both companies. Every vendor recommends hiring a professional electrician to cover their butts, yet they sell these components through retail channels like Amazon and West Marine without any hesitation. That’s similar to how the big pharmaceutical companies run TV ads urging ordinary mortals to use their dangerous prescription drugs.

The scariest part was when I went to secure the final battery positive connection from a stacked combination of my fused inverter cable (2/0 AWG), the solar charger/controller’s temperature sensor, and its  8 AWG positive battery cable. The post sparked like hell as soon as I touched it, so I stopped and went to get my neoprene gloves knowing that I would have to secure these three connectors to that post by hand and with a metal wrench.

I tried to research this sparking problem online because the ProMariner manual doesn’t mention anything about this in the installation steps. But of course, it’s Saturday and no one is answering the phone at ProMariner headquarters. Not impressed about that, since someone could get killed installing their product the day before Father’s Day while they’re offline. What if there were combustable gasses in the air? The device claims to be “ignition safe,” yet here we have a massive spark on first contact that could have brought the Hindenburg down?

But… when I finally worked up the nerve to try again — no spark. This suggests I had experienced some kind of static build-up charge that dissipated after that initial contact. But still, to have no connection instructions or warnings in the manual for an $800, high-powered device that could kill you in a heartbeat?! Really? Yes, a trained electrician should be doing this job, but what if he didn’t expect that little zap to happen either? Seriously, electricians are like surgeons. Even the best of them will get caught off-guard. I’ve seen it happen.

By around 7 PM, the inverter felt warm but the batteries and all cables felt the same as the ambient temperature. So that’s all good.

Windows & Solar Testing

Today I got the custom window order off to Jeff at motionwindows.com in Vancouver, WA. The cost for eight identical windows is $2,200.

They’ll have a cutout dimension of 14×14″ with a 3″ corner radius and a wall depth of 3-1/4″. Nothing like this was available commercially. I went ahead and ordered a 6″ hole saw from Home Depot and will carefully mark the cutouts soon.

Because the windows are so small (more like portholes on the Space Shuttle), they’ll just be fixed, dual-pane glass that won’t have any sliders or screens. I don’t want anything to obscure the views, and I already have two vents for ventilation up top. I’ll be adding windows to the back doors and those can have traditional sliders and screens.

Today’s also the day I get enough cables, connectors and fuses to test my solar panels, charger/controller and battery bank on the front porch. Unfortunately it’s not a sunny day but that makes for a good test too. Sunday, however, should be 82° and clear.

It’s Official!

The RETROvan™ is official now. I finally got my registration and custom plates today. I still can’t believe they were available, especially here in Oregon where anything “RETRO” is cherished.

The RETROvan will be used to represent my software business in a marketing and advertising capacity. I will work in it as a home and mobile office, and occasionally host clients in it for the purposes of growing and maintaining my business. The RETROvan may also be used as a showpiece for any future business involving or documenting the restoration and retrofitting of vintage vehicles.

The front bumper had no screw holes so I had to drill my own through 3/16″ steel. It took forever to sneak up on a bit size where the frame’s cheap screws would hold without stripping. Even the small tasks catch you by surprise. And there’s nothing more frustrating than a stripped screw that won’t budge!

I checked in again with Ted King at Portland Engine Rebuilders and gave him the go-ahead to send my cracked intake manifold out for re-welding. That’s done in a furnace, which will deform the iron. So it has to be re-machined afterward. He says it should be done next week and cost up to $450. But at this point, I don’t have any choice because our replacement searches came up empty.

My cabinetry plywood arrives tomorrow so I’m shopping for pocket screw jigs, and settled on this highly-rated Kreg bundle for quality joinery.

I’m also getting closer to a final design for the galley cabinetry.


From Booth to Berth

Here’s the final design for the RETROvan’s convertible booth/berth cushions:

It’s a 12-cushion set being made by Tricia at CushionSource.com. The booth is 60 inches long and 24 inches deep with a 6-inch backrest, which means you can stretch out on it, seat four with elbow room, or seat six in a pinch.

The Americana vinyl is black, white and red with contrasting welting.

The decorative clapboard-style headrests are totally custom, for branding purposes. These will be very labor-intensive and I’m making a leap of faith here. As I mentioned before, five or six shops flat out refused to undertake this job, so I was lucky to finally find someone who doesn’t like to say “no.”

The white armrest cushions at the back end of the booths allow you to lean up against the back doors of the van while closed. But they’re loose, so they can be leaned into a chaise lounge position, used for lumbar support, or even as portable cushions for outdoor seating.

The six seat bottom cushions will be attached to my custom bases with Velcro, but they can flip over if one gets damaged. The back cushions will also affix to the walls via Velcro, but when converting the booth to a berth I’ll simply lower the table and lay the back cushions on it. That’s why they’re exactly 13-1/2 inches tall.

The filling is a premium blend of water- and mildew-resistant materials, including a layer of gel-based memory foam. So they should be very comfortable — not to mention expensive. The total cost is $2,944.73 including shipping.

When laid flat, the eight main cushions will form a queen bed: 60 inches wide and 75 inches long. And that means two people might just survive a Zombie Apocalypse (or a weekend at an Oregon beach) in relative comfort.

The Solar System

The RETROvan will be powered by a combination of solar energy, 120V shore power and a 12V deep-cycling battery bank. Note that this “house” system is completely separate from the system that starts the engine and runs the original cockpit equipment, although it’s possible to combine them in the future.

InputsLet’s start with the most interesting input. Four of these flexible WindyNation panels will be affixed to the roof with Gorilla Tape, just behind the forward vent. Each 12V panel generates up to 100W for a combined output of 400W when wired in parallel. The panels are very durable and flexible enough to hug any curves. In fact, they’re so tough you can walk on them. These should provide ample power, but here in Portland we’re above the 45th parallel and have gray skies for several months of the year. So we’ll see how it goes.They’ll be connected via a variety of standard MC4 adapters using 8 AWG cable, and then a single pair of cables will drop into a waterproof gland mounted through the roof.This is a component I initially thought I could do without, but now I know it’s vital. It’s a 40-Amp MPPT Charge Controller made by Renogy. It maxes out at 400W (they say, conservatively), so it’s a good match for my four PV (photovoltaic) panels. Each panels can generate up to 6 Amps for a total of 24 Amps, well within the controller’s limits.

The controller monitors the batteries and regulates the flow of current from the solar panels, optimizing how the batteries get charged. It also prevents the current from discharging from the batteries back into the panels, which could fry them.

This is similar to what the inverter/charger does, but the controller uses DC while the inverter uses AC. In other words, the solar panels charge the batteries from the sun via DC. The inverter charges them from AC shore power. So, the big question is, what switches safely between them when AC is available? Will I need some big master switch or knob?

Here’s the Marinco stainless steel shore power port I mounted through the side of the hull next to the entry door.With this cool little adapter, I can connect any ordinary 15 or 20-amp household extension cord. How convenient is that?

AC/DC — For Those About to Rock!

Here’s the helm console, the RETROvan’s nerve center. Scotty would be proud. It’s made for pontoon boats. It’s hollow, and just happens to be the perfect size and shape for the power it will pack.

Two 6V AGM deep cycle batteries will sit end-to-end inside the helm console, wired in series to form a single 12V battery. They’ll deliver up to 200 amp-hours of off-griddy goodness, and are much more performant than one or two 12V batteries. Not only are they a perfect fit, but at 60 pounds each they’ll hold the helm console down on the floor (with the help of some bolts, of course). A solid base is important because the helm will also act as a bulkhead for the passenger seat.Here’s the power plant, and by far the most expensive component so far. It’s a ProMariner pure sine wave inverter, charger and transfer switch — all rolled into one. AC connects to one end and DC to the other.

Here’s the basic wiring schematic for the ProMariner. But, it doesn’t describe how to connect solar panels. Hmmm…

This system can supply up to 2000W of AC power from the batteries, which is enough to run most of my 120V appliances at the same time. But for ovens and coffee makers (basically anything that generates heat), you must be careful about how much power you draw. A coffee maker, for example, can gobble up 1000W or more for a short period of time. And off-gridding a 15,000 BTU RV air conditioning unit on battery power is out of the question. It can only be run continuously while on 120V shore power. So, circuit panels and gauges are as important as being energy-conscious:

This the AC panel, mounted on the right side of the helm. Its backlit labels will read something like:

  • WARP DRIVE
  • IMPULSE POWER
  • GALLEY
  • PHASERS
  • PHOTON TORPEDOS

This is the DC panel, mounted on the left side. Its backlit labels will read something like:

  • COMMUNICATIONS
  • VENTILATION
  • LIGHTING
  • ENTERTAINMENT
  • CABIN OUTLETS

Outputs

The AC galley outlets will simply terminate in a Belkin surge suppressor.

12V lights, fans, TVs and other accessories can plug into these matching sockets.

And there’s even one for USB. These are all made by Blue Sea Systems in Bellingham, Washington where my kids go to college.

I still have to figure out all the right cable sizes, lengths, lugs, fuses and so on, and that’ll take some time to research. When connecting the main power and the batteries, for example, one wrong choice can spell disaster.

You may have noticed the helm console is sort of designed around a steering wheel. So in the case of the RETROvan, we’ll just mount an iPad instead. I did it by modifying a unique iPad stand made by AboveTEK. The result looks like something right out of Star Wars.

You may also have noticed a theme so far in my design and purchasing decisions. Virtually all of these components are black, white or gray in keeping with my branding theme. So that means if, say, a company’s product is some ghastly color combination like yellow or green, it doesn’t make the cut as long as I have other choices.

Design Elements

Okay, enough with the boring stuff. Let’s look at how the interior design is shaping up.

Seating

The captain’s chair and passenger chair have been a very difficult decision because of the plethora of options. I love the marine style but I need the RV safety and comfort. And then I found this unique seat, made by International Harvester — yep, for tractors. And tractor seats are notoriously comfortable. I couldn’t be happier with this find, especially given its styling. I’ll need to bolt on a lap belt, of course.

It will mount atop this adjustable, hydraulically-assisted Swivl-Eze pedestal. The steering wheel is inordinately tall, so it’s important for the captain’s chair to telescope up and down.

For the passenger chair, I’m leaning toward this Flexsteel model, which I’ve mocked up in Photoshop with a two-tone color scheme. Mine wouldn’t have the skirt and I’d mount it on the same type of pedestal. I haven’t ordered it yet, because it’s pretty spendy. It needs to recline and be more comfortable than the captain’s chair because I plan to work in it for hours at a time.

Cabinetry

I’ll be constructing all the bases, table and counter tops, shelves and a bulkhead out of 3/4″ maple plywood. I don’t want any wood tones to be visible in the design, so they’ll be painted. Hopefully something like a piano-grade lacquer finish.

Walls

The entire cargo area will be re-covered in 1/16″ thick aluminum panels. I count 19 panels total, and I’ll have them custom cut a local metal shop. They’ll be much easier to handle than the 12-foot sheets I had to remove.  For access to cables, plumbing and fixtures I’ll mount them with screws instead of rivets.

The wall panels might be covered in this WilsonArt laminate, called Retro Diner. The samples I got just make me smile.

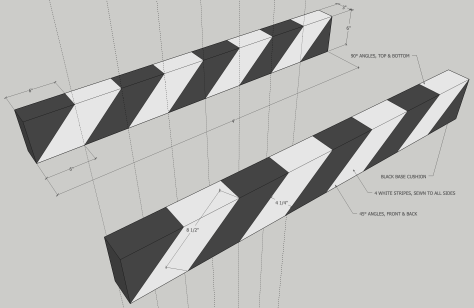
I’ll cover the custom dinette/berth in a future post, but these are important design elements that will mount on the aft walls as headrest cushions. I finally found a vendor (Tricia at cushionsource.com) who is willing to make these.

They represent a movie clapboard when a director calls “Action!” And they’ve been an integral part of my company’s branding since 1986.

This is an IKEA medicine cabinet that will mount on a wall somewhere.

This one will mount on the bulkhead above the captain’s chair. It’ll be be great for Zombie Apocalypse essentials like ibuprofen, sunscreen, bandages, antiseptic, toothpaste, ammo, etc.

Ceiling

The ceiling panels might be covered in these PVC ceiling tiles. The style is art deco, like you’d find in an old theater. These come in various metallic finishes but I like the contrast of white against the walls and everything else.

Lighting

There will be two banks of these six LED lights, one forward and one aft. Each light is small enough to nestle nicely in the center of an art deco ceiling tile.

And here are the LED dimmer switches, one per bank. The lights will be on the same 12V circuit, fed from the helm console. I love how big and fat they are. They come in black but the white is easier to find in the dark.

Ventilation

Two of these Fan-Tastic automatic vents will keep the interior cool and dry, hopefully obviating the need for air conditioning and reducing the chance of condensation and mildew. We’ll see…

Here’s the remote control for each vent/fan. The forward vent will be set to blow and the aft vent will be set to suck. That should help keep any engine smell out of the sleeping area.

Flooring

These interlocking 12-inch tiles are made from the same material as flip-flop shoes. And they’re durable and cheap enough to simply replace if they get damaged over time. Best of all, they’re cushy to walk on. They also have some sound-proofing and insulation properties. They’ll rest atop a plywood subfloor and maybe a foamboard insulation layer.

GalleyThis is the galley cabinet. It’s a 46×18-inch Husky mobile workstation (tool chest). I’m removing the wheels and the butcher block top, and will replace the top with 3/4-inch maple plywood fashioned into a 6-foot countertop with sink, retro formica and diner-style metal banding. The stainless steel handle might move to the left side and serve as a towel rack.I’ve replaced the “HUSKY” emblem with a more appropriate one for the RETROvan, and it looks super geeky!

Here’s the sink. It’s 16×16 inches and 8 inches deep with a sound-proof coating underneath. This will mount above the cabinet door, surrounded by retro formica. I haven’t chosen a faucet yet but I’m considering using a wall-mounted one. That way I can route the plumbing through the 3-inch wall cavity instead of the cabinet, thereby saving space. I’ll address fresh water and gray water tanks later, but they can mount under the floor.

Here’s the WilsonArt Nostalgic Gray laminate for the countertop and table top. The boomerang pattern compliments the walls and reminds me of the Jetsons.

And here’s the retro aluminum tee banding, which I’ll install myself along the edges and rounded corners with a special slot cutter and a rubber mallet. To make the curves without deformation, the grippy tee flange must be cut out at strategic intervals.

AppliancesThe countertop will span over this cool retro refrigerator/freezer. The fridge will sit directly behind the driver’s seat, keeping precious cargo chilly for happy hour.

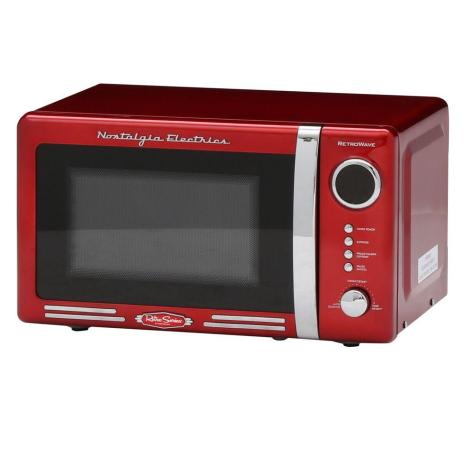
Two ovens will stack above the fridge in the cabinetry. The convection toaster oven handles two 12-inch pizzas. This is not the exact microwave I wanted, but a bigger model with the oval window should be back in stock soon for an exchange.

A matching coffee maker will grace the countertop, with a matching waffle maker stowed away in the cabinet. Yep, it’s an awesome product line.

Miscellanous

Here’s the fun little retro JVC “Teeny Vision” TV and the iView digital media box I mentioned before. Great for home movies. This will probably complement an iMac or other flatscreen. Maybe even a projector.

This is just a nice welcome mat that happens to fit atop my front desk and glove box safe. Mazy, our cat, also likes it. 🙂


The cockpit has an engine-fed heater to the left of the driver’s seat. But what RETROvan would be complete without an LED ceramic heater? This thing looks incredible and it will take the chill out of the night year-round, especially around the holidays.

And finally, this was a birthday present from my amazing wife. You can swap out the USS Enterprise schematic between Star Trek: The Original Series and Star Trek: The Next Generation. And the LED lights can cycle through eight colors. This will go somewhere near the helm console, which I’ll detail in a future post.

More to come…