Caffeination

Today I ordered a smallish trash bin. Originally this was going to be secured inside the galley cabinet but the water tank plan changed all that.

My dad pointed out that I might need to screw the bin to the floor so it doesn’t move around in transit. But maybe it’s heavy enough on its own — we’ll see. It’s also about the right height to put your feet up on from the passenger seat.

It will need a special decal, of course.

And speaking of biohazards, I pulled the trigger on this Keurig K250 coffee system, saving $40 on CyberMonday direct from Keurig. The color is Plum Gray (not Imperial Red), which will go nicely with my new cabinet and countertop colors. This color is also prominent in my retro dish set. The reservoir holds 40 ounces of water but overall it’s pretty slim.

This version 2.0 machine can brew our favorite single K-Cups, plus Travel Mug Pods and Carafe Pods — which make four cups at a time and keep it hot in this double-insulated stainless steel carafe. Now that’s what I’m talkin’ about!And then there’s this retro heated travel mug. Very cool — er, hot.

I spent the rest of the day updating my various iOS and macOS apps, having a blast working in the RETROvan. I even took a hot-tub break in the middle of the day. Try doing that in some cube farm! 🙂

Top Figgage

Today I moved my 5K iMac into the RETROvan and got to work, slinging code. Gigabit Ethernet, 65 Mbps Internet tap and a Hogan’s Heroes marathon on the Apple TV. That plus a couple bowls of Crunch Berries and I’m set.

It’s 51.1° outside and a cozy 65.3° inside, thanks to the PuraFlame “fireplace.” The humidity is 95% outside and only 54% inside, thanks to the Ivation dehumidifier.

The only thing I’m second-guessing today is my choice of coffee makers. The Nostalgia Electrics unit looks nice and retro, but I’m more of a Keurig K-Cups guy. It’s more convenience and less messy. So I’m toying with this CyberMonday deal at $30 off:

The only downside I see is that the Keurig consumes 1500W, while the retro model comes in at 1000W. And remember, my inverter tops out at 2000W while my fireplace is 1250W! Not a problem when I’m moored on the RETROpad on shore power, but something we’ll have to load-balance on trips.

Last night Olivia and I were talking about how we never see our doe and the raccoons at the same time. And then right on cue, we spotted two raccoons up in the fig tree dropping ripe figs to the ground for the doe — all right outside our bedroom and sunroom windows.

If you look closely, you can see one of the raccoons climbing down the tree trunk, face-first. Not sure whether this is coincidental behavior, or if the doe is offering protection (from us) in exchange for top figgage.

The Trash Man Cometh

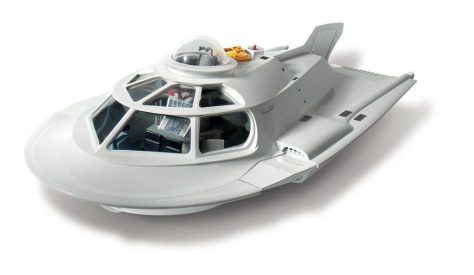
Last night I finished the Proteus model. There are a lot of details on the inside that you can’t see anymore but it turned out pretty good.

We didn’t do much on Sunday besides send Shannon home on the bus, eat leftovers, take a nap, clean up the garage and watch football.

Tonight is trash night — The Most Wonderful Night of the Week. Because tomorrow my last round of RETROvan construction debris will be gone and I can fill those bins up again. And this week, Olivia will even get to park her car in the garage. 🙂

Next up for the RETROvan: Flooring. I’m still having second thoughts about the rubber puzzle tile, but I want to give them a try first and make sure they can be cut cleanly. My backup plan is either hardwood or industrial carpet. We’ve seen that the floor will get wet and dirty, so that’s a concern.

The Home Stretch

Shannon goes back to school tomorrow and Olivia will be visiting her mom in Tampa shortly, so this morning we picked out a cute little Festivus Tree at Al’s Garden Center. Then while the girls shopped McMinnville, I spent the afternoon reassembling the cabinetry and installing the appliances. There were some adjustments to be made to the height of the cabinets, but it all worked out in the end — just in time for a very cozy happy hour.

I’ll just let the pictures do the talking, here…

Retro Diner Trim

Steven had to drive back to Bellingham for work this morning but Shannon (aka Rosie the Riveter) is still here to help. So we trimmed the dinette table by tapping the 12-foot aluminum strip into its slot.

We’ve never done anything like this before of course, but it turns out to be pretty easy. That is, once we realized you can’t use tin snips to cut out the fins. They cut the metal just fine, but the scissor action twists the piece. Fortunately the aluminum was pliable enough to coerce back into shape.

So instead I formed a simple miter saw jig out of a yard stick and protected the trim’s face with Frog Tape. Then while Shannon supported the long piece we cut slots into the barbed tee. These slots form fins that allow the trim to bend along the table’s 3-inch radius corners with only a slight ripple effect. All it took was a few taps and a little leverage. We could only cut one corner at a time between fittings, but this took less than an hour. The final trick was trimming the end just right so it abuts the beginning at a clean seam. My first attempt at marking this was 1/4″ too long, so I had to trim the rest with my Dremel tool. But then I nicked it and had to cut it 3/32″ short. Oh well, it’s not that bad.

My only concern is whether the trim will stay in place over time. Once you tap it in and pull it out a couple times, the plywood slot loosens up a little. So for the final fit I ran a bit of Gorilla Glue into the slot wherever it looked like it wanted to pop out.

I’m glad I ordered two 12-foot pieces of trim. That was mostly for backup in case I screwed up the table. But now we have a stick left over for the galley counter top and the two shelves. The shelves were super easy, just 24-inch straight pieces. I can’t install them just yet because I won’t know which edges are the fronts until I match the screw holes during assembly. But then the trim will just tap into the slots I pre-cut.

The countertop has one slight bend and one prominent 90-degree bend. So for those I just cut out slots big enough to make sure the tee never obstructed itself during bending.

Here’s the galley corner. It came out great if you ask me. No one is going to scrape themselves slipping into the port berth bench past that corner. It’s smooth and pretty — much better than two pieces mitered together.

And here’s the dinette table, ready for a future car show. 🙂

Thanksgiving

Happy Thanksgiving, everyone!

Last night Steven made a cheesecake. Yum — especially with cherries on top.

Then we hung out on the RETROpad, enjoying the hot tub, fire pit, music and a few brewskies in the warm drizzle. It was 60° out, which is unseasonable.

This morning, we just chilled on the front porch and decided not to attempt the chrome trim today. Shannon helped me get the RETROvan ready for Thanksgiving dinner and the Cowboys game. Then she learned to throw a spiral on the front lawn.

Here are the two main pieces in place, before the bench seats went in.

Some Trump-colored snackage before dinner. The Cowboys took the day off too, losing 28-6.

And dinner itself, as seen from the RETROcam. Honey Baked Ham, turkey breast, sweet taters, greenie beanies, stuffing and “qua-sons.” Later we played Apples to Apples and Shannon won.

Laminate

Today, Steven and Shannon helped me cut and apply two styles of WilsonArt “Retro Diner” laminate to the galley shelves, countertop and the dinette table. And I’m thankful for the help, because this job required six hands at times.

This style is for the dinette table, which converts to the center berth base. I absolutely love this design. It reminds me of The Sixties, specifically the artwork in The Jetsons and later Mad Men.

And this is the more demure style for the galley countertop and the double oven shelves. It’ll make my red appliances really pop. Note that the boomerang patterns are actually the same size. This gray one is just zoomed in.

The first trick was learning how to properly support and cut the awkward 97×49″ sheets without damaging them. My jigsaw came with a Laminate blade but we quickly found that a thinner, finer Sheet Metal blade works much better. Even so, we had to discard two pieces due to crackage, but we had plenty of material to work with and still have some left over. We measured and cut each piece with at least 1/8″ of overhang. We used the berth base cabinets for support, forming a long cutting trough between them. Ideally a proper shop would have an 8×4-foot work table. But no, we used my Craftsman table saw stand as a portable work surface.

We used Gorilla Glue (the construction variety) and a caulking gun to apply the adhesive to the bare maple plywood surfaces. We later learned that we were supposed to use a glue roller to form a layer all the way to the edges, but I didn’t want to risk any seepage since the edges are already finished. The only exception is the dinette table, whose edges will be wrapped in retro chrome trim:

The next challenge was how to trim the laminate overhanging the edges after the glue sets. For that, a trip to Harbor Freight in Tigard yielded a router bit that is designed just for this purpose. Some call it a laminate bit, and some call it a trim bit. But the cheap set I found just calls it a straight finish bit. The key feature is that the collar is on the bottom of the blades versus the top. That allows the collar to act as a guide, rolling along the finished wood without damaging it. My Black+Decker 20V Matrix drill driver came with a small router attachment, and we were able to figure out how to the set the depth correctly so that the blade only cut the top 1/16″ of material — which in our case, is the overhanging laminate.

By the time we got to the countertop we were experts. Even the sink cutout we traced looks professional. We left the dinette table top for last, and we didn’t bother jigsawing the rounded corners because the router proved it can handle that just fine. And it did.

After routing the table top perimeter to trim it, we ran this special $40 slot cutter around the edge and formed the 1/2″ deep channel that will secure the chrome trim.

It’s important to do this after the laminate is in place because that increases the thickness of the piece by almost 1/16″ (1/32″ plus the glue). The chrome trim is 13/16″ tall by design, which matches the 3/4″ wood plus the 1/16″ laminate layer. The special slot cutter is sold by the same company that makes the chrome trim (Eagle Aluminum in Minnesota), so the fit is virtually guaranteed.

Stay tuned for photos of the results, once we piece everything back together ahead of Thanksgiving dinner. We may not get to the chrome trim, but that’s okay. Steven made his world famous cheesecake. 🙂

Fantastic Voyage

As a therapeutic side project, I’ve started building a 1:32 scale model of the Proteus submarine from Fantastic Voyage. The military miniaturized this vessel and its crew, and injected it into the body of a Cold War scientist to dissolve a blood clot in his brain.

The movie featured Donald Pleasence and Rachel Welch, but the real stars were this prop and the OSCAR-winning special effects. The Proteus raced against the clock, traveling through the various systems of the human body, including the heart, lungs and brain. The crew even had to fend off attacking antibodies in one of the more memorable scenes.

I used to build lots of models as a kid, and all the tricks are coming back to me. The biggest challenge is that my eyesight and hand-eye coordination is not quite the same. But I have a lighted magnifying glass and make simple jigs out of common household items like Scotch tape, Q-Tips, toothpicks and waxed paper.

So far so good. I just finished the hull’s paint job. It’ll look like these photos when it’s all done, and then I’ll find a way to showcase it in the RETROvan.

This afternoon I’ll get back to buffing and polishing. Cringe.

Procrastination

I’m still procrastinating over the fresh water tank size. I found a second possibility that might work. The problem is where to put the fittings and the elbows that have to fit either inside the metal galley cabinet, or through its wall on the right.

Here’s the safe bet. This is Ronco’s 11-gallon model, which if I stand it upright I can have about 2 inches in the front for fittings. My pump only needs 4-1/2 inches of clearance between the tank and the sink, and its motor will nestle to the right of the drain assembly just fine. I just need to make sure I can get my hands in there too.

And here’s a 12-gallon model that might not fit in the front unless I drill a clearance hole on the inner cabinet door wall. Or, just run the connections into the refrigerator’s space. But if I do that, the cabinet’s right wall is 1-1/8″ thick, counting its inner and outer panels. So that means those fittings might also require nipples. And the more connections you add, the more points of failure there are.

What to do? It was a tough decision based on imperfect information, but I went with the 11-gallon option and got that order sent off on Monday morning. The extra gallon just wasn’t worth the risk of an uncomfortable fit. I specified the outlet port to be on the front corner, because the RETROvan slopes that way.

As part of that decision process I refitted wall panel D2 over the plumbing box and noticed something was a bit off. The faucet’s chrome trim rings weren’t making good contact with the aluminum wall panel, so I removed everything and rebuilt the sides of plumbing box. When I took the box out I found that the bottom Kreg pocket screws weren’t even making contact with the spacer because of the notch I formed to miss the rivets. So I replaced that joint with two steel corner brackets using six screws each.

This rebuild only took an hour or so, but now I won’t lose any sleep wondering whether the faucet might someday jar loose. I also closed up the mis-measured 1/4″ gap at the back and secured the right side of the box tightly to its vertical rib and left the left side of the box float a bit, while secured by longer sheet metal screws. And now it all fits perfectly. The nipples poke out at just the right length and the faucet is sturdy.

I spent the rest of the day struggling to polish all the handprints and scratches off a few more aluminum panels. I had washed the bonnets with some success, but I also bought some new terrycloth ones. Ultimately I decided to order ten microfiber bonnets since they seem to work best for the final phase, soaked in Klean Strip lacquer thinner.

This process is not going well because of the black oxidation layer that forms and immediately re-coats the metal. So now I have a choice. I can either spend a inordinate amount of time and energy trying to get it off — or, I can call it a feature and shoot for a consistent “pewter” look.

Our goal is to stage everything back together by Tuesday for our kids’ Thanksgiving visit. That means the sink won’t be usable, but that’s okay. And hopefully while they’re here they can participate in some of the construction. Specifically I’m thinking about laminating and trimming the shelves, countertop and dinette table as a family project. Or maybe some RETROpod work. We’ll see…

More Water & Power

Today I learned a custom 15x15x15″ 13.5-gallon water tank would cost about $2,000 — so that’s out. Plan B is to order their 11 gallon off-the-shelf model, which is 15.375×13.5×13.5″. That will fit into my cabinet with a little room to spare, and it’s only about $170 with fittings and shipping.

Another day, another hole saw. I cut a 3-1/2″ hole in the hull on the driver’s side, for my ShurFlo “city water” inlet. That fixture acts as a pressure regulator when you connect a standard garden hose to it.

The hole inside is 2-1/8″ on panel P1, behind the refrigerator. That hole allows ample access to the big thumb screw on the elbow fitting. I’ll connect this barb to the tank’s inlet fitting with five feet of 1/2″ braided nylon hose. This fitting is pretty low to the floor, so I’ll have to cut a hole in the galley’s wooden footer. I wish I could have put this inlet higher, but I wanted it in the “hinge” position on my clapboard graphics on the outside, matching the shore power port on the passenger side.

None of these connections will be visible from the inside because they’ll be blocked by the refrigerator. I may even run the hoses into the side of the stainless steel galley cabinet for the same reason. That way most of the plumbing is accessible by simply pulling the fridge out (not the galley).

My drain hasn’t arrive yet so that’ll have to wait until tomorrow. I also need to finalize the water tank’s fitting positions by then to get that order in-process.

So next I cut some holes in the helm to route the RETROscanner’s USB power cable out of view. I also received my fancy 12″ USB cable for the iPad, so now nothing needs to be bunched or tangled up.

And finally, I received my last round of custom AC/DC panel labels today. It took forever to remove the old adhesive residue cleanly from the window ledges, but finally they all fell into place — and they look fantastic.

Here’s the DC panel. I wound up swapping the 3rd and 4th circuits into a more logical order, compared across the board to the AC panel. That was relatively easy from the backside, and this time I didn’t drop either terminal screw into the abyss.

And here’s the AC panel. The 1st and 2nd positions act together in tandem, controlling 30A service to the remaining circuits. The reason the 2nd indicator light is unlit is because that is a special red warning LED that only lights in the event of reverse polarity (a mis-wiring condition). That was clear from the panel’s original labels, but in the RETROvan I’ve wired that master breaker not to shore power, but rather to the inverter’s output. It’s the inverter’s transfer switch that decides whether to produce 120V power from either shore power or the battery bank, which is kept charged by either shore power or the solar panels.

Everything you see above is fully operational, but I haven’t yet pig-tailed in my 12V water pump cable. I did run that cable through the wall and the galley cabinet today, under the sink. I wish I had left a dedicated circuit for that, but the pump will only run intermittently so I’ll just tap it off the lighting circuit co-labeled “GALLEY 12V.” I thought about tapping off the ventilation circuit, but those vents are more power-hungry. So I think it’ll be fine.