All posts by Scenario

Stop Motion Studio

Returning to my filmmaker roots well ahead of retirement age, Scenario RETROfilm’s little indie animation shop is progressing nicely with Olivia’s help and support. Here are our key technical investments:

Dragonframe 4 software and Bluetooth controller

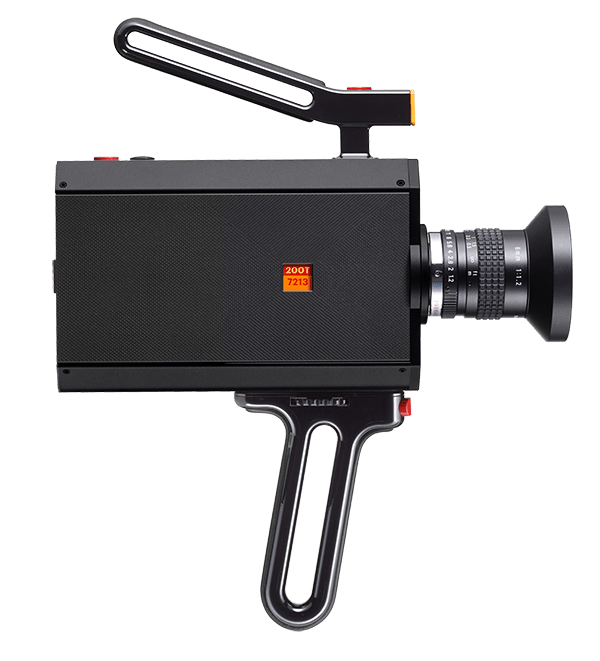
Everything revolves around Dragonframe‘s amazing stop motion software and communication protocols. Compared to back when I did stop motion in the early 80s, the process is infinitely easier today. For example, Dragonframe has an “onionskin” feature which lets you superimpose the previous frame over the current frame in order to check your puppet moves. So you get immediate feedback instead of waiting a week to get your Super 8mm film back from a Kodak lab.

Canon EOS Rebel T6 bundle

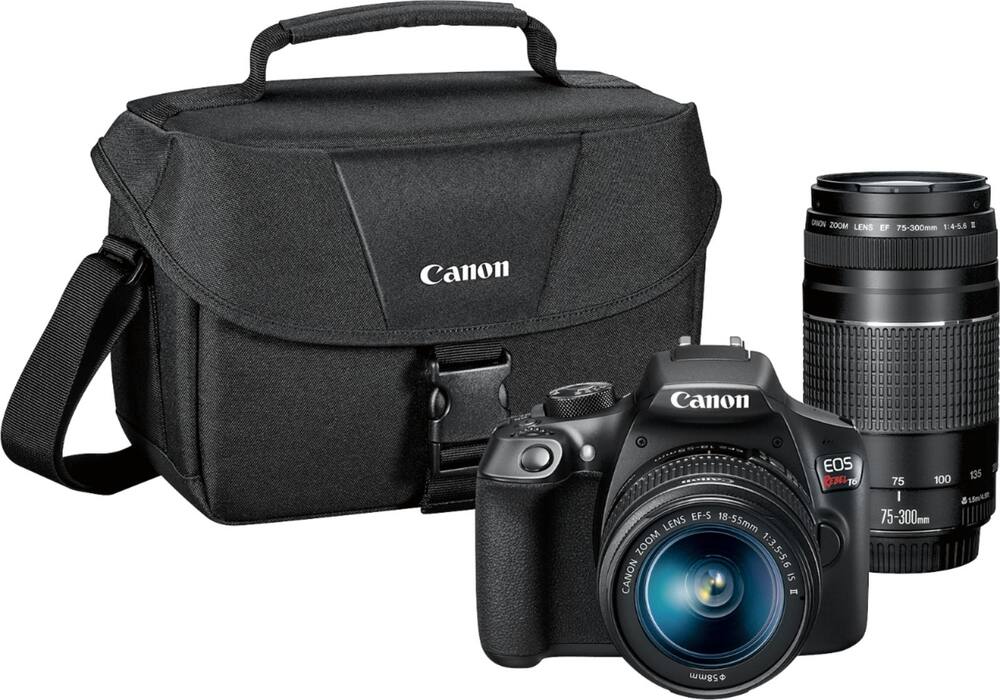
Believe it or not, most stop motion is shot on DSLR cameras — not video (or film) cameras. This bundle was the best value which still meets all of Dragonframe’s requirements, as it communicates best with Canon EOS bodies. That includes the ability to display a live digital view on a Mac through the lens, and the ability to control every aspect of the exposure for every frame. This camera can produce 4K RAW images, which Dragonframe then strings together in sequence at whatever frame rate you want. That’s typically 24 fps, which means a 10-second scene is 240 frames and a 10-minute film is 14,400 frames.

The only modification I made was to swap out the Canon primary lens with a Nikon manual aperture lens. That way Dragonframe can take control of the aperture and eliminate any chance of flicker between frames. This is a known problem and a long-established solution among animators.

eMotimo ST4 Dragonframe Bundle

This is a 4-axis motion control rig sold by eMotimo in San Diego. It’s basically a robot that can smoothly repeat complex camera moves across a scene, producing the parallax shots that today’s short-attention-span-challenged audiences expect. The eMotimo Spectrum ST4 is the only head that talks directly to Dragonframe and can scrub through a shot in real time. That is a godsend to animators. That means if you screw something up in the middle of a scene that has taken hours to animate, you can simply undo those frames and the camera will move back to the precise position it was in. This rig is also great for time lapse shots and even live, unassisted interview shots. Not pictured is its remote control: An off-the-shelf PlayStation 4 DualShock controller. Simply brilliant. Kudos to eMotimo’s team, led by founder Brian Burling. He personally sold me this system.

VIVO Electric Stand Up Desk Frame w/Dual Motor and Cable Management Rack, Ergonomic Height Adjustable Standing DIY Workstation (DESK-V103E)

The slider will rest atop this adjustable platform made by VIVO (the same company that made the retractable TV ceiling mount in my RETROvan).

I’ll cut a rounded top myself out of 2’x8’x3/4″ cherry plywood. Then I can mount all kinds of equipment to it, like a power strip, drawer, keyboard shelf and even my iMac itself via a VESA bracket. This is much better than having one or two tripods sprawled out next to your set, as tripping hazards.

J.Lumi track lights

Overhead we have some cool studio track lights, fitted with LED bulbs (both daylight and warm). We’ll supplement these with other articulated desk lamps and in-set lighting as needed.

So yeah, we’ve been pretty busy writing scripts, acquiring props and building sets — inbetween our day jobs of course. I’ll post some photos of them later. Generally we’re working in 2x2x4-foot modules using 1/2″ plywood. Three such sets are currently under construction and they look amazing. Each set will simply move to a larger desktop (under those studio lights) for shooting, in production order.

Apple & Thunderbolt 3

I recently sold my 5K iMac (late 2014 model) and replaced it with an iMac Pro. Having bought dozens of Macs over 33 years, I was careful not to fall for Apple’s price-gouging trap. Particularly when their internal storage options are now priced at a ridiculous $2,800 extra for a 4 TB SSD (solid state drive). Yes, I emphasize “extra” because you get no credit for the 1 TB stock SSD they replace.

My “old” iMac had a 3 TB Fusion Drive (a combination of mechanical and solid state), so I had to do some serious juggling to pare my internal storage needs down to fit a more affordable stock 1 TB SSD.


In doing so, this was part of my solution: The super-sexy Samsung X5 Portable SSD – 1TB – Thunderbolt 3 External SSD. It’s priced at $499.99 now on Amazon. This drive uses the latest super-fast PCIe interface, called NVMe (cleverly pronounced “Envy Me”). Here are the typical write/read speeds I’m getting with it:

This makes it ideal for use as a Final Cut Pro X cache drive. I’ve learned that to maximize data throughput for video production, it’s important for the system to avoid reading/writing to the same drive. It’s better to read raw video files from a fast, read-only source drive, and write all the project data out to a separate, fast destination drive.

By comparison, here are the typical write/read speeds I’m getting on my iMac Pro’s internal 1TB SSD:

As you can see, they’re both scorching fast. For some reason, the internal writes faster but the external reads faster. They’re very similar on average, though: ~2215 MB/s external versus ~2583 MB/s internal. That means the Samsung X5 is within 15% of the maximum possible performance — and that’s good enough for me, especially considering this solution saved me $300 versus Apple’s inflated upgrade price of $800 to go from 1 TB to 2 TB. That, and it’s portable to boot.

The TerraMaster

Since replacing my 5K iMac with a new iMac Pro, I’m a huge fan of Thunderbolt 3 for maximum throughput. Meet the TerraMaster D5 DAS (Direct Access Storage). You buy this enclosure empty, and add your own drives. I installed five 8 TB Western Digital “Red” drives inside. They’re 3½” SATA drives, not SSDs. Why? Well, because the cost per terabyte is less than $59 and this enclosure puts a super fast interface on them to make up the difference.

I got the enclosure on an Amazon “Lightning Deal” for $639, where the regular price was $799. Each hard drive was $249. So for a total investment of $1,884 I got 40 TB of total storage, which should meet my demanding video production needs for the foreseeable future.

This is a RAID controller, so I configured it using RAID-5 mode. That means out of 40 TB of total storage, the controller will read and write data across all five drives at once to maximize access speed and redundancy. So while the effective available storage is reduced to 32 TB now, that means any one drive can go bad and everything keeps working until that drive can be replaced. Once replaced, the controller rebuilds the array and all is good again.

I’ve been using a 16 TB NAS (Networked Attached Server) for a couple years, so there were a number of problems to solve:

  1. Access speed to and from my NAS was too slow over Gigabit Ethernet. I was spending way too much time waiting for large files to copy. It was also doubling as an FTP server for my security cameras, which meant that it was very painful to browse those files quickly or efficiently.
  2. I was close to maxing out the space on my NAS. At first I used it in RAID-1 (mirrored) mode, which cut its available space down to 8 TB. I later switched it to RAID-0 (striped) and then to JBOD (just a bunch of discs) mode to gain access to all 16 TB, but of course that left me nervous about a potential drive failure.
  3. My NAS was not encrypted or backed up. Not good.

Configuring the TerraMaster took some trial-and-error, given that its UI is typical Chinese garbage. My goal was to strike the best balance between performance, convenience and security — on a volume-by-volume basis.

The first major decision you have to make is the base format. On a modern Mac, your main choices are “MacOS Extended (Journaled)” or “APFS.” You get the option to add “Encrypted” to either choice, but that’s where things get confusing.

Apple’s Time Machine, love it or hate it, is not yet compatible with APFS. And worse, Time Machine does not play nice with encryption. So after a few false starts, here’s what I wound up doing:

  1. I made a dedicated 2 TB partition using Disk Utility. I formatted that partition using MacOS Extended (Journaled, Encrypted) and named it “Time Machine.”
  2. I formatted the remaining 30 TB partition as APFS, unencrypted.
  3. Within that 30 TB partition, I created a few different volumes. APFS volumes get dynamically resized, so you don’t have to commit to those sizes the same way you would for partitions. I chose Encrypted for some of those volumes, and left others unencrypted.

Why? Because encryption incurs a performance hit and I don’t need that much security for everything I’ll use this file server for. And plus, you can always add, rename or resize volumes later in Disk Utility without losing data. And you can replace them as long as you have a way to back them up first.

Using the Blackmagic Disk Speed Test app, here are some typical results:

  • Write/Read to unencrypted portions of DAS: 515/755 MB/s
  • Write/Read to encrypted APFS volumes on DAS: 475/725 MB/s
  • Write/Read to encrypted Time Machine partition: 375/375 MB/s

Now by comparison, I had some cool 1 TB SanDisk Extreme SSDs connected via USB 3.1. They cost $199 each. Those SSDs yield around 450/500 MB/s on my iMac Pro. So you can see how these 8 TB SATA drives are comparable to 1 TB SSDs at a fraction of the cost: $59 per terabyte versus $199 per terabyte — just not nearly as portable.

So yeah, I’m pretty happy with this solution. Especially considering the biggest 2½” internal SSDs you can buy are 4 TB. And they still cost around $699. Using five of those would yield only 16 TB and bring the total investment up to around $4,134 or $258 per terabyte. That’s 4.4X more expensive than these traditional mechanical drives. And by the time these start failing, SSDs will be much cheaper replacements.

Now there’s some learning to share, for those of you thinking about (or struggling with) the same setup. Here are some lessons I learned:

  1. Apple’s System Utility teams are sadists, and there’s a special place in Hell for them. Not just Disk Utility, but other essential tools like Migration Assistant, Time Machine and AirPort Utility. Their biggest sin is not providing actionable error messages.
  2. Make sure you understand the limitations of Apple’s file formats up front. And no, they aren’t very well documented.
    • Time Machine cannot write to an APFS drive, period. It’ll warn you that the disk is not the right format. Sadists generally don’t want you to know about their shortcomings.
    • You can partition a drive (or an entire RAID array) first, separating the MacOS Extended (Journaled) portion from APFS. And then you’ll have the best of both worlds — as long as you pick the right amount of space for Time Machine to grow over time up to a limit. In my case, I chose 2X the size of my iMac Pro’s internal SSD.
  3. Be sure to encrypt Time Machine’s partition first, using Disk Utility. Then add that volume as a Backup Disk in Time Machine’s UI. Tell Time Machine to use “Encrypt backups” again at this point, even though it doesn’t make any sense.
    • If you do it this way, Time Machine will make its initial backup in around 90 minutes for a 1 TB system. And then it’ll all be done. Yes, it’s inexcusable that Apple continues to ship versions of Time Machine without proper guidance in its UI, when clearly they know about these pitfalls.
    • If you don’t do it this way, Time Machine will make its initial backup very quickly, but it will spend days encrypting it separately. That is no exaggeration. This is a major flaw in Time Machine’s algorithm. That progress indicator will be stuck at around 13% for hours and hours while your drive(s) thrash.
  4. Know that if you’re ever tempted to uncheck Time Machine’s “Back Up Automatically” checkbox, it will abort any backup in progress without warning and it’ll have to start over. Yep, like I said: Sadists. That button used to be titled something like Start/Stop Backup, which reflected the fact that this control is more of an action than a preference. But the lack of a confirmation dialog is absolutely negligent on Apple’s part.

Modular Power

Today I installed this nifty little modular outlet under the dinette table, to help keep various computer cables out of people’s way.

The photo shows how the module snaps in and out of its mounting plate, making access super easy. The power cable isn’t long enough to reach my wall plugs, so I’m planning to run this extension cord down through the storage cabinet under the port bench:

This cord is unique in that it terminates in a single, grommeted outlet that will mount cleanly through my 3/4″ plywood wall. All it requires is a 1-3/4″ hole saw and a twist of the wrist — and not an electrical box. And here’s the result. That a pretty cool little extension outlet:

You might notice that new trim piece on the floor. That’s a 1-1/4″ aluminum bracket cut to length, then screwed through the rubber and into the marine plywood subfloor.

Here’s the treatment on the entry well. That’s a single piece of aluminum, notched and bent at 90°. This piece will prevent people from tripping over the edges of the rubber floor. And it looks better to boot.

My Next Toy

Despite all the naïve controversy stirred up by digital snobs, I’m getting pretty excited about Kodak’s new Super 8mm movie camera and film processing model.

This gadget will fit in nicely with my Scenario RETROfilm business plan, allowing me to integrate new interviews or other nostalgic footage into home movies that are 50 years old, preserving the same retro aesthetic without some cheap digital filter.

You can learn more about it on Kodak’s website. I love their processing model. You buy the film in 50-foot cartridges. It’s expensive, but that includes shipping, digital processing and hosting. That allows you to begin working with your footage before you get the physical film back from the lab.

The camera should roll out in October at between $2,500 and $3,000. There are four types of film cartridge, priced at $30. There are also interchangeable lens and lots of connectivity options. Super 8 Sound always sucked, but you can plug a digital microphone into this camera and capture audio on an SD card.

This is all a godsend for those of us who grew up living and breathing Super 8, turning our parents’ garages into studios.

RETROfilm Intro

Feeling polarized?

November is coming. That means elections and Thanksgiving dinner, which bring anxiety and stress for many Americans today.

You’ve probably asked yourself how we got here, facing our siblings and parents down across the social, political and cultural divides that only seem to widen with each news cycle, post and tweet.

Sociologists say we’re the products of our environment. Sure, everyone’s family dynamic was different growing up. You’re a baby boomer who fought in Vietnam and your brother is a pacifist. But you were also the same in many respects. You both still love country music and baseball, right? We have the power to redefine what it means to be family…

But we’ve all forgotten how much common ground we share.

Meanwhile, your old home movies are slowing disintegrating. Your amateur 8mm, Super 8mm and 16mm films may be dusty, moldy and scratched — but they still tell a compelling story. The story of us.

Let us help you tell that story before it gets lost to time.

At Scenario RETROfilm, we believe that when families, neighborhoods and cultures take the time to share their stories, through laughter and tears, we naturally become more human. We start to understand each other. We break down tribal barriers. We start to care again. We cooperate for the common good.

We heal as a family and a nation.

Scenario RETROfilm is gearing up to help you tell your stories through your own treasure trove of film. If you’re lucky — and old enough — you probably have a pile of film reels stashed away in some attic, basement or closet.

We will carefully transfer your old films to state-of-the-art digital videos. We’ll organize them, curate them, edit them lovingly, and find just the right music to accompany them. Sometimes funny, sometimes somber, but always avant-garde.

Then we’ll help you find a hosting plan or another easy way to share them with your friends and family.

Our rate for VIP-level service is only $1 per second of finished film. Yes, that’s $60 per minute or $3,600 per hour. And what you’ll get is not just a home movie — but a documentary.

We’ve done hundreds of RETROfilms, but here are some samples:

We at Scenario RETROfilm hereby declare each November to be #NationalHomeMovieMonth, and the weekend before each national election to be #NationalHomeMovieWeekend.

Share and share alike.

Allow Me to Vent

Yesterday my 3-3/8″ hole saw arrived from amazon.com so I started on the venting for my air conditioner.

That plastic fitting is going to snap into an oval hole in the cabin wall. I started by tracing the fitting and then carefully checking all measurements. I want the fit to be tight, so I’ll “sneak up on it” while I cut. I drilled two 1/4″ pilot holes to make sure the wall cavity is hollow. Then the hole saw made quick work of the ends.

I had to cut the top and bottom with a mini hacksaw, because none of my power tools would fit in there. This required about an hour and several F-bombs.

The fitting snaps into the hole with a little coercing, and the 6-inch flex hose just barely makes those turns without getting in anyone’s way.

Okay, so that gets us venting warm air into the wall cavity, where the goal is to avoid any kind of vent hole on the outside fender. At first it looked like I was done because warm air was finding its way out through the wheel well. But soon that wall became superheated, and the air conditioner was struggling to knock even 10° off.

So I spent the next two hours on my back drilling 1-1/4″ and 1-1/2″ ventilation holes up under the wheel well, in the floor of that narrow wall cavity. I was careful not to weaken that brace too much. And now, warm air positively blows out of those holes.

I will monitor the unit’s performance this week as the weather heats up again. I may decide to cut another hole straight out the fender from the hose fitting, and use a cool retro chrome vent cover like this:

This would allow the warm exhaust to flow mostly straight out, using the ventilation holes I drilled in the bottom to create a chimney effect. Since heat rises, cool air would be drawn in from the bottom, creating a convection current. That might improve efficiency pretty dramatically.This is another option. A simpler 5-inch round louvered vent from greatlakesskipper.com. They were both cheap so I ordered them to see which works better.

This Honeywell air conditioner is rated at 10,000 BTU and 450 square feet. The RETROvan is only around 100 square feet. It’s fairly well insulated but it’s not air-tight. So if this unit doesn’t perform up to expectation, they do make 12,000 and 14,000 BTU models in the same form factor. Buying this one from Home Depot was strategic because they have a 90-day return policy.

So, bring on the heat now, Mother Nature!

UPDATE: This air conditioner just isn’t cutting it. The best performance I’ve seen is an 11° delta. But once the outside temperator hits around 96°, that delta shrinks to 6° making the inside of the RETROvan a sweltering 90°. I need there to at least be a 15° delta for this to be worthwhile. It’s just too hard to work above 85°.

So, I’ve ordered Honeywell’s $450 14,000 BTU model and will return the $350 10,000 BTU model to Home Depot once it arrives. The units are the same size and style, so it’ll be a simple swap-out of the main unit.

Air Conditioning

My air conditioner arrived today and it’s a good fit, ergonomically speaking.

I just need to route its power cord to the same dedicated outlet the refrigerator is plugged into, using another 120V power strip up front at the dashboard area. That’ll come in handy for other things too.

And then I need to figure out the proper venting, so it can pump warmer air outside instead of recirculating it. The unit came with 6-inch flex hose, so I’ll need to figure out whether I can connect it to the cab’s existing right front air vent somehow. If not, I’ll cut a new 4-inch hole in the hull and use my cool new stainless steel vent cap. 

It’s only 71° out right now so I’ll give it a good workout later in the day. I love that it has a large-capacity dehumidifier, too. That’ll prevent mold and mildew better than my small Ivation unit, and also prevent condensation dripping in the RETROvan’s ceiling cavities. Those are real concerns for RV owners in the Pacific Northwest.

UPDATE: After a number of trial fits, there is really only one way to vent this unit where it sits. The 6-inch flex hose terminates in a fitting shaped like a scoop. That scoop snaps into a 3-3/8″ oval cutout. So, I ordered a 3-3/8″ hole saw and plan to cut into the interior of the hull just above the front-right corner of the dashboard platform. From there, if the hull cavity is hollow, I can drill  a few ventilation holes under the chassis. If that works, you’ll never know there’s a vent. If that cavity is not hollow, then I will need to cut a hole on the exterior of the hull, below the front of that side window.And because those two holes don’t need to connect, the exterior vent can be any shape, including this 4″ stainless steel vent cover. We’ll see…

Chillin’ on the RETROpad

This week was a hot one. So hot, that I can’t really work in the RETROvan in the afternoon once the temperature tops about 95° and my iMac is running at 110°. So I broke down and ordered a portable air conditioner:

This stylish 10,000 BTU Honeywell unit sells for about $350 on homedepot.com. It will sit up in front, on top of the dashboard platform near the entry door. The unit also doubles as a dehumidifier, so it could be useful year-round. It weighs only 60 pounds so it’ll be easy to take out when not needed. It draws about 1100 watts at 6 amps, so I’ll have to keep an eye on my circuits. Fortunately Home Depot has a good return policy if it doesn’t work out.

You may recall my original plan was to install a traditional Dometic RV air conditioner on the roof. But that posed two problems: I would lose some precious headroom where the interior vent console hangs down, and it would crowd or even displace my solar panels on the roof due to its large footprint (30 x 40″). So I think going portable is not only more ergonomic, it’s a lot cheaper and requires less work to install.At worse, it’ll require a 4″ vent hole to blow warm air out of the cabin. But I already have two such vent holes in the front cabin firewall that I may be able to use. If not, I can cut a new hole and use this cool stainless steel exterior vent cover.

This is the 15-gallon holding tank that will connect to my galley sink drain for grey water. It just sits under the RETROvan and can be rolled out for emptying and cleaning. The galley’s fresh water tank holds 11 gallons, so this is a good match considering you might dump additional fluids down the sink. Fill the fresh water tank? Dump the gray water tank. Easy.

Here’s how the glass tile finished out on the RETROpad. I’m very happy with it. It gleams in the sunshine, lending more of a resort-like feel to the patio where we hang out on a lot in the summertime.

And here’s a shot of my new galvanized steel steps, which replaced my cantilevered timber steps — which kept splitting. I reused the timber stringers, but I’m struggling to de-warp them (with water and brick counterweights) and will likely end up replacing them with denser wood or maybe some custom metalwork. Each step is fastened with 3/8″ x 2-1/2″ hex bolts, so that part is good. They look great, but don’t try to climb them while wearing high heels. 🙂