Category Archives: RETROvan

Window #2

Yesterday I cut the port side back door window holes, and Olivia helped me install the window. Here’s how they look when dry-fitted:

We’re thinking it would be nice to find some small awnings to mount above them as fixtures.

This window took another five hours to cut, mostly because of how close the inner and outer wall panels are to each other. That, and because my 6″ Milwaukee Hole Dozer seems to be be wearing out after only 16 holes, now preferring to leave a groove rather than a clean, round hole. So with eight windows to go, that means I’ll need to buy four more hole saws at $40 a pop.

And here’s the view from inside the RETROvan. The windows provide much-needed natural light and ventilation. I have decided I’ll need to insert a 1-1/8″ wooden frame around these windows to keep the aluminum panels at a consistent distance apart.

It looks like I can install one window every two days, based on how my back aches after doing this up on a wobbly ladder. But I’m hoping the side windows will be easier because I won’t have the wall-thickness problem. But I will have a different problem: The fact that the inner wall panels have to align across a 3-1/4″ wall cavity, leaving little room for error. But at least I can cut them flat on a table before screwing them in place.

Woohoo!

Yesterday Olivia helped me tighten all the bolts on the driver seat and passenger seat. That, after yet another trip to Home Depot to get the ideal combination of bolts, lock washers, fender washers and nuts. Not all of them could be the same combo because under the deck, the bolt holes had to dodge various steel frame elements.

But the result is good, and both seats feel solid. And hey — the driver seat is actually centered on the steering wheel now! Both International Harvester tractors seats are fully adjustable and they swivel, so even the driver seat can be part of the party. And that means the RETROvan seats eight comfortably. Nine, if you count Mazy in her bed on the front desk.

So today I’m marking, drilling and cutting out my first 24×24″ window hole in the starboard back door. The windows are premium quality. They’re dual-paned, tinted glass, with symmetrical locking sliders and removable, sliding screens. Wish me luck…

The first problem was with the 6″ hole saw and centrifugal force. It’s intimidating enough on its own, but once I spun it up with my DeWalt drill there’s way too much kickback when the drill stops suddenly. That drill doesn’t spin down gracefully; it’s either on or off at full speed. I didn’t feel I should risk scraping the surrounding wall whenever I let go of the trigger. So I switched to my cheaper, slower Black + Decker drill and had marginal success. However, it’s underpowered and too slow, and starts to bind and heat up quickly. And then it finally died so I was forced to buckle up with the DeWalt anyway. The trick was to lock my shoulders and right elbow tightly against my body. Not easy when you’re up on a ladder, too.

The next problem was that the back door cavities are barely 1-1/8″ deep between the inner and outer panels, and my jigsaw cuts to a 1-1/4″ depth. And that means a lot of chatter and kick-back. So my solution was to jam some landscape spikes between the panels to spread them out a bit, along each cut line. This worked, but it was still slow going. This must mean that the side windows will be easier.

It took all afternoon and several batteries, but I managed to get both holes cut through the door. The corners are more ragged than I expected but they’re covered nicely by the window trim on both sides.

Olivia helped do the dry-fit, which was pretty easy. And she approves of the window style and placement. Just one window dramatically changes the RETROvan experience. Next I’ll need to determine whether these windows need an interior frame to keep the aluminum panels spread out to a full 1-1/8″, because they’re pretty wavy. The final fit will include closed-cell foam tape and exterior Dicor sealant around the flanges.

Only 72 more corner holes, 72 more side cuts, and 9 windows to go! Woohoo.

Windows

You may remember my Window Plan post from April.

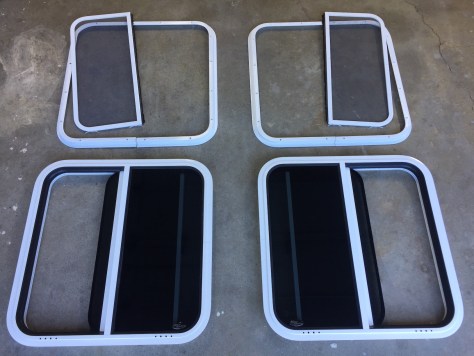
Today I drove up to Motion Windows (aka Peninsula Glass) in Vancouver, Washington and picked up my eight side porthole windows, and two rear picture windows. There I met Jeff Kemp (my salesman), Mike (a foreman) and Trent (a fabricator).

Mike was kind enough to give me a tour of the shop. They do everything onsite except for powder coating. They have their own water-jet cutter and a furnace for tempering smaller windows.

Here’s how the extruded aluminum frames are measured and bent to shape, with the help of a custom NC machine that automatically adjusts a “hard stop,” onto which the operator places the end of the extrusion. To me, this is the most amazing part of the process because it ensures that window frame will only have one seam, where the two ends of the extrusion ultimately meet after all the corners are bent to spec. Mike explained that this involves some serious math, which must take into account the deformation characteristics of the metal.

And here’s Trent, the fabricator who did the final assembly on my job. He helped me load the final product in the back of my SUV:

The windows came with seal tape and white screws, and an actual physical cross section of how one should be installed. All ten windows are dual-paned, but the larger rear windows have sliding screens that will face each other symmetrically.

So tomorrow I’ll start measuring the two back windows, one on each door just above the dinette table’s height. Those windows are each 24×24″ square, with 3″ radius corners. The walls are 1-1/4″ thick so I should be able to drill four reference holes from one side, then use my 6″ hole saw to cut out each corner. The inner wall has to line up precisely so since the hole saw is 2″ deep I’ll just use it to help locate tiny reference holes on the opposite side, then mark and cross-check their centered measurements from the inside to make sure the inner outline is square. The windows do have some play in them but the more precise the cut-outs, the better. Once each group of four corner holes are cut, I’ll mark and connect their tangents with my 4″ circular saw. (I can’t use my jigsaw because it cuts deeper than 1-1/4″, so the blade would bounce around on the opposite wall.) Then I’ll repeat for the next window. The side windows should be easier because those walls are 3-1/4″ thick, and that means I can use my jigsaw.

Total cost for ten custom windows: $2,956. But, I’m saving around $2,500 on shipping and labor. Motion Windows does install (replacement) windows for $100 each, but they won’t do any wall-cutting because that’s where all the risk is.

Leaks

With rain looming, Saturday’s goal was to screw and seal the HDTV antenna and the solar cable entry gland. What can possible go wrong, right? Well, the tube of Dicor lap sealant malfunctioned in my caulking gun and burst open at both ends, blapping a pile of white sealant on the roof. So I had no choice but to use my fingers to finish the job. Apparently I forgot to puncture the tube’s inner seal.

What is it about seeing someone up on the roof of an RV that makes people think it’s a good time to come over and make smalltalk?

Next, I wanted to finish cutting lumber so I could move my saws out of the garage and use it for, you know, storing vehicles. So to get access to the cockpit floor, first I had to remove the original driver’s seat post.

The main bolt was rusted in place after 56 years, so I had to use a PB Blast penetrating oil that my brother-in-law recommended. (He’s a metal worker.) A few heavy doses of that helped, but I still had to wedge an adjustable wrench on the nut against the deck and then pound a 11/16″ socket wrench with a sledgehammer. After a half hour of this back-and-forth, it broke loose and was out. That’s a pretty good feeling.

From there I spent around two hours carefully measuring and cutting the plywood cockpit floor pieces to size. These were my most complex cuts by far, because not only did it have to fit a non-square space, it had to clear bolt heads and the empty seat post bracket that was still bolted to the frame below. So that required some crafty jig-saw work to make a 16-sided shape.

There were also some hex bolt heads sticking up from the diamond plate deck, which meant the plywood did not lay flat at first. My solution was a simple one: I set the floorboard in place and stomped on it, making impressions of the obstructions in the bottom of the wood. And then I simply drilled out 3/8″ countersinks in those spots. It fits like a glove now, and soon I’ll be able to mount the driver’s seat pedestal through it all.

The last task was to cut out a hatch in the floorboard to access the starter battery compartment. This required a U-shaped rectangle with sharp corners. So to get my blade in there, I first drilled a 3/8″ hole in the center of the U’s base, which will serve double duty as a pry point for opening the hatch with a screwdriver.

The front step needed an angle cut  because of the way the bi-folding “school bus” door closes. If I keep it like this without creating a tripping hazard, I’ll finish it later — maybe with just red paint. Note that all of the marine plywood still needs a coat of polyurethane followed by the finished flooring material.

The White House has no monopoly on leaks. Water can be far more insidious than even the most inept presidential administration.

While the rest of the world slept on pins and needles, last night we camped out in the RETROvan together for the first time. The bed was firm and cozy using sleeping bags, and the climate inside was just right. We watched a variety of free HDTV for a while before nodding off. Heavy rains started around 3:45 AM. We know this because the vent over the berth dutifully whirred to a close once its sensor got wet, waking us up. We not only got rain, but hail too. The storm lasted about three hours.

Throughout the night I was able to locate several drips. Most of them appear to originate from the main seam in the roof, traveling along the lateral ceiling ribs and dripping at the lowest spot from there. And that means the drips are rarely where the leak is. The entire roof is covered with a thin layer of rubberized sealant, but that coating is cracked, flaked and failing in several places. So water is pooling up wherever the ceiling sags a bit, then it’s wicking under that coating and finding its way around rivets in that main seam.

You can see from the dirty shorelines where water has pooled in the saggy spots on the roof. These may be useful clues. You can also barely make out the main seam just to the right of the two vent domes.

I was hoping I could just run a 4″ or 8″ Flex Tape along it, but when I looked at it this morning I’m not convinced that would work. It’s not like the seam itself has obvious failures. That is, you don’t see any rivet heads protruding topside. So my guess is that water is getting under the old rubber coating through a number of cuts and scrapes, wicking under the coating and then finding the seam. So I think I’ll need to re-coat the entire roof with cans of Flex Seal or similar. And I am not looking forward to that mess! Hopefully I can use a roller, making sure to mask off my solar panels first.

Or better yet, I found that Camping World does this kind of work. They also use a system called Seal Tech, which uses air pressure (inside the RV) and a soapy film (outside the RV) to locate the sources of leaks.

Blood & Sweat

With my self-imposed deadline of September 9th looming (NFL weekend #1), I made efforts to reach the end of the dry-fit phase of the project.

This week, the RETROvan has drawn blood and sweat — but no tears. The blood came from a gash on my forehead from hitting a sharp aluminum brace, and the sweat came from global climate change. We haven’t had rain in Portland since spring, and that’s highly unusual. Especially with high humidity, I’m only getting a couple hours of work in at a time.

Tuesday I managed to slip the third deck piece into position, under the helm and the refrigerator. This was less impossible than it sounds, considering how heavy the helm is. But the helm is still tippable and it slides. Once I got it the floor under it, I noticed the driver’s side is about 1/4″ too long, which means the cargo area is not square. But that can be compensated for with the frontmost floor pieces, which will have to be custom cut anyway to work around various obstructions and access panels in the diamond plate subfloor.

Assumptions, assumptions…

The 3/4″ marine plywood floor adds considerable stability when moving around in the RETROvan, and provides much needed support for fixtures like pedestals. I’m leaving 1/8″ gaps around all edges on purpose, for expansion and for the ability to remove a section of floor if needed. Those gaps can be filled with silicon caulking to form a better seal against moisture, insects, etc. And then the whole floor will be covered with my B&W rubber puzzle tiles.

I next proceeded to finish assembling the galley cabinet and bulkhead, running out of Kreg pocket screws in the process. My biggest pet peeve is zinc-plated screws that strip if you look at them. Screws should always be stainless steel, but Kreg’s screws are special and they only come in zinc. But at least for the first time folks can see the real shape of things. The double ovens fit great, and there’s still plenty of room on the upper shelf for foodstuffs. That cabinet will eventually get swinging doors with an RV latch.

On Wednesday I replaced the refrigerator’s temporary extension cord with a hard-wired dedicated 120V circuit and custom plug. The Nostalgia Electronics fridge is on its own circuit because you can’t risk spoilage — or warm beer. That circuit only draws 110W, so my 2000W ProMariner inverter can service that load 24/7 just fine on solar and battery, whenever the RETROvan isn’t plugged into shore power.

I found a better place for the weather station display, above the TV on the mounting arm. That provides an ideal viewing angle for its LCD display. But soon after installation, it was reporting an inside temperature of 112° when it was only 97° outside! Turns out it’s actually measuring the heat generated by the TV, which just won’t do. So I need to move it again.

That evening I spent an hour or so attaching spade terminals to the six LED lights that will make up the aft lighting bank in the ceiling. That makes it so each light can be detached and removed more easily, which is important because they’ll be part of an aluminum ceiling panel assembly.

I’ve figured out that each bank needs to be wired in parallel, so that each individual light gets a full 12V. Otherwise, if wired in series, the total circuit would require 72V (6 x 12V). So to do this, I finally found a pair of six-way bus bars made by a company in New Zealand. Unfortunately they’ll take a month to get here.

We finally see rain in the forecast for Sunday, so that means I need to screw and seal the HDTV antenna mount and the solar panel entry gland into position on the roof. Then I’ll need to camp out in the RETROvan during rain to check for any leaks.

Battle Stations!

Saturday I got busy and fixed my front desk, by adding a layer of maple plywood to stiffen the top — which was bowing under the weight of my biometric safe. I painted the edges of the plywood with black spray lacquer.

Somehow after reinstalling the engine, the cowl must have shifted so that its support bracket was now 3/4″ closer to the passenger wall. So I had to shorten the top of the desk’s plastic StarBoard anyway. But the result is good. I took this opportunity to replace all the screws with 2-1/2″ #12 flat-heads, which I countersunk into the StarBoard.

Next up on Sunday, I tackled the daunting task of mounting the 19″ Sony Bravia HDTV to the ceiling, over the helm. This involved some careful planning. That and a Band-Aid for my forehead.

I first cut a piece of 3/4″ maple plywood to about 10″x23″ to span the helm’s ceiling cavity. Then I cut and screwed four pieces of 3/4″x1/8″ thick aluminum angles to the top of the board. The protruding brackets will mount to the ceiling ribs, and the plywood will “hang” upside down by the collective friction of 32 screws.

This unorthodox design is important because an aluminum ceiling panel has to eventually cover this mounting plate, so everything had to be flush across the bottom of the plate. That is, it couldn’t have any aluminum “lip” creating a 1/8″ gap, and it couldn’t have any screw heads protruding below. I was actually surprised this worked so well. I could even hang from it, which is a good test because the motorized mount is almost as heavy as the TV itself. Probably about 60 pounds total. That may not seem like much but remember, this is an RV and it’ll be bouncing around too.

Here’s the TV in its upright and locked position, mounted to the motorized swing arm’s VESA plate using the standard 100x100mm hole pattern for TVs smaller than 23″ diagonal.

And here it is after slowly unfolding to the down position. Now that makes me feel like I’m doing something tactical in a spacecraft. “Battle stations! Battle stations!”

The TV is small enough where I can actually add another display of some sort above it, attached to the upper part of the swing arm. So maybe I’ll mount the weather station up there and free up some space on the helm for something else.

Here’s how it all looks from the door. I’ll finish installing a dedicated AC circuit and button up all the wiring tomorrow, but for now I’m exhausted! We stayed up pretty late last night playing poker with our old friends, Terri & Allen. 🙂

Heatwave!

Nothing like a summer heatwave to slow things down. Here was the actual weather report for Portland on Wednesday, including a lot of smokey haze from brushfires all the way up in British Columbia:

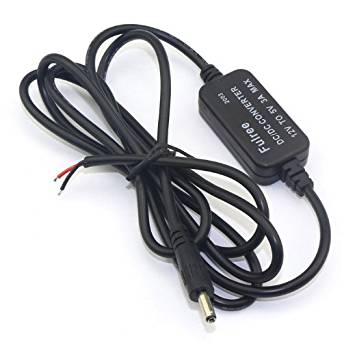
I did successfully modify my cool digital weather station from 120V to 5V, so now its backlight can stay powered up like any other helm instrument. That involved cutting the plug off its AC adapter, and butt-splicing it onto this 12V-to-5V step down converter (replacing its crappy plug):

Getting this to work was quite the confidence booster. The only problem is, this voltage converter spits out 7.5V according to my multimeter — not 5V as advertised. It does work, but I wonder if it’ll burn out that gadget over time?

Next up is the TV. We’ve had this little 19″ Sony BRAVIA TV for a few years now, and it’s a trooper. It sports the requisite B&W design to fit the RETROvan theme. And it’s got great industrial design to boot. The problem is, where to mount it? It takes up a lot of shelf space so I don’t want to just set it on the galley counter. And the rig doesn’t have much open wall space to hang it, either.

So here’s my solution. This is a $129 motorized ceiling mount for flat screen TVs. Those X-shaped fins are optional, and I won’t need them for such a small TV. I should receive it Saturday, and then I’ll know whether the 100x100mm VESA mounting holes line up with my TV without some crafty modification. If so, then I’m good to go. This thing will be amazing, hung directly over the helm like some tactical heads-up display on a battle cruiser. It also has a remote, but you can make it hoist up or down just by nudging it too.

Its motor plugs into 120V AC, so I bit the bullet and will run a second Belkin power strip straight up the passenger wall from the helm’s AC panel. I’ll need to plug in the TV and an Apple TV box anyway, then I’ll still have three empty outlets on that side. To wire a power strip like this directly to an AC panel you have to cut off its plug, strip down its three wires, and butt-splice them to another cable. In my case I’m using Ancor 12/3 AWG marine grade wire for AC, along with Wirefy heat-shrink terminal connectors. So the business end of this power strip screws directly into a circuit breaker inside the helm, and the plugs never know what hit them. The two Belkin power strips I’m modifying this way also have their own surge protectors.

I’ve had to drill so many ragged 3/4″ holes in the RETROvan’s frame ribs that I just had to find some decent grommets. The ones I got from Ancor really suck, but these are great. They actually stay in place! Of course now I have to figure out how to replace all the bad Ancor grommets. I’ll likely wait until I have a good reason to pull a cable and push it back through, because that means replacing connection terminals which take a lot of time to fabricate. I may have to do that in order to install the wall panel next to the helm, which will require a line of holes or some kind of slot. But I shouldn’t forget how important these are. You don’t want power cables getting frayed by shrapnel inside your walls. So all of the 120V AC circuits will have these heavy duty grommets for sure, but I’m not so worried about the 12V circuits.

And that brings me to Climate Change. This week’s heatwave proves that two vent fans aren’t going to keep a metal box any cooler than the ambient air temperature, even running at full blast and even though the breeze feels good on your skin. At one point on Wednesday, my weather station said it was 109° outside and 117° inside. Really? I thought this was the Pacific Northwest — not Death Valley!So, I started researching A/C units and came up dry. I really like this new Blizzard NXT model by Dometic. But it’s a whopping 30×40″ and weighs 96 pounds! I only left 21″ between my two columns of solar panels, which means I’d have to un-tape them and move them. Worse, this unit requires a 20A circuit breaker, which means I’d have to replace a 15A module in my AC panel. This unit can be had for around $749, but when you add the required air distribution box and the separate wall thermostat, you’re looking at close to $1,000 with shipping.

I do like this Penguin air distribution box for the interior because of its retro design. But it’s not clear whether it’s compatible with that A/C unit. Dometic does make a Penguin top unit of course, but it’s not as sleek as the Blizzard — and it’s still 29″ wide which still won’t fit.

So now I’m thinking A/C can wait until maybe next spring, or I’ll just avoid being inside the RETROvan when it’s this hot. But I do hate the thought of opening up ceiling and wall panels later to retrofit more technology. The degree of difficulty for installing one of these systems is at least an 8, considering that Dometic doesn’t even publish any installation manuals. They want you to pay their dealers to do it for you.By the way, my Nostalgia Electronics fridge is still holding up its end of the bargain, maintaining around 50° even in 117° heat. I didn’t really expect that kind of performance, but that’s the advantage of having a real compressor versus the typical RV “cooler.”My backordered microwave finally arrived this week, and it’s appropriately badged as a “RETROwave” oven.

Oh, hey! I just got an email saying my eight porthole windows are ready to pick up. I’ll wait until the two back windows are finished too, then I’ll make a single trip up to Motion Windows in Vancouver, Washington. I saved a ton of money on crating and shipping that way.

Summer Vacation

Lots going on lately. I’m on vacation and half of my family has been here from Tampa and Seattle. It was too soon to take the RETROvan camping with us at Trillium Lake, but my scramble to make things presentable was rewarded by the arrival of twelve dinette/berth cushions from a shop in Minnesota.

The custom movie clapboard headrests turned out amazing, and the rest of the cushions look great. But I can’t Velcro them into place until I finish painting the base cabinets and attach the aluminum wall panels.

There is, however, a problem: I had specified exact dimensions for each piece, not accounting for the ‘crowning’ effect of the premium filling. So each cushion came out a half inch too big, and no one at CushionSource.com warned me about this. Even a half inch per cushion adds up to two inches across the entire span. So now I have to fit 75 inches of material into a 73-inch span when reconfiguring from dinette to berth.

It’s not terrible, but it does make it very difficult to squeeze the backrests onto the middle table top to form the queen bed. You really have to wrestle them in place and that’s disappointing. Once again, you make extra efforts to plan things out and then you inevitably get back something that’s out of spec. It has happened several times during this project, when outsourcing was required. Maybe in this case the cushions will get squishier over time? They’re pretty firm now, which is good for sitting and sleeping.

But overall, I’m satisfied with the results. Especially considering how the engine rebuild went. And when the windows arrive I’ll have much bigger fish to fry.

My son was here for a couple days, and he’s a Manufacturing Engineering major. We bolted the main pedestal in place and my daughter helped me jig-saw the 24×48″ table corners round, using the same 3″ radius as the window corners. Those are the subtle design consistencies you don’t really want anyone to notice. It’ll just all feel right, because our brains are wired to subconsciously detect patterns.

And of course this task involved yet another trip to Home Depot because my 3/8″ bolts were a half inch too short underdecks, where 56 years of rust flaked off into my eyes. But we got it done, and then tried things out for Happy Hour and had a great time seating six in the booth, comfortably.

I was relieved to not have to cut an asymmetrical notch in the table top. We all just agreed it would be ‘skinnies’ on the right, ‘fatties’ on the left. But ergonomically speaking, almost anyone can get their legs between the galley cabinet and the table top while in the act of sitting or getting up. As long as they don’t put too much weight on the edge of the table top, of course. The retro laminate will go on later.

Meanwhile, I received my first batch of custom AC/DC panel labels and put a few on the helm. The verbiage was very carefully thought out, of course. I’ll post pictures later when that’s all settled. I also found some cool iPad apps to simulate activity on the helm. Apps like sound meters, music visualizers and LCARS displays from Star Trek: The Next Generation fame.

My son also mounted Photon Torpedo Tube #1 above the driver’s seat. This custom speaker can looks amazing from inside and outside the RETROvan, and I couldn’t wait to hear it in action. So today, I ran a 12V circuit up above the cockpit and wired up my Pioneer AppRadio 4. Then I pre-wired a second Sony 2-Way Marine Speaker, which is not mounted in a can yet. It’s just resting on the overhead shelf. I had been using a Bluetooth speaker, set on that shelf. But these two speakers really up the ante, and I don’t have to recharge them of course. You can actually enjoy music over the whir of the ventilation fans now. And I’m digging that, sprawled out on the berth as I type this post.

Normally the receiver would be wired to the parking brake, the reverse shifter, and the accessory switch on the ignition key. But for the RETROvan, I’ve hard-wired it directly to the helm’s DC panel so that it can always be turned on, fed by solar and/or shore power. That involves a special jumper that bypasses the annoying feature that kills all the fun stuff while your vehicle is in motion. I can always turn it on or off via the DC circuit breaker. Later I’ll have to figure out how to enable the backup camera, maybe with a manual toggle switch to simulate putting the RETROvan in reverse.

So today, my DC ampere load went from 0.5 for just an iPad and an LED display, to a whopping 1.0 amps including the receiver and two speakers. I’ll wire up the other two rear speakers soon, but I have to fabricate three more cans using my custom plastic mounting adapter rings — and that will take a lot of time drilling holes with delicacy.

Oh, one major problem: When the RETROvan’s back doors are closed, I don’t get any WiFi from the house. That might change when the back windows go in, but I did go ahead and order another Apple AirPort Express to extend my network right at the garage. If that doesn’t work, then I’ll have to go with a non-Apple antenna made for RVs. Those work like an extender inside the RV with the antenna mounted on the outside.

I also got a cool, white, bat wing-shaped HDTV antenna made by King, to mount on the roof and pull in all the local TV channels for free.

I slept in the RETROvan until 5:38 AM, when it just got too cold. That motivates me to finish wiring up the AC circuits so I can plug in that cool space heater/fireplace.

I also ordered one of these weather station displays, which may mount on the center of the helm. I love colorful infographics!

Oh, and one last thing: I found a nice collection of Star Trek background audio loops for some retro high-tech ambiance, which makes the RETROvan feel even more like a movie set.


Floor it!

Today I ordered four sheets of marine grade 3/4″ plywood from Home Depot for my modular floor sections. I’m taking a bit of a risk buying these sight unseen and trusting someone making minimum wage to pre-cut them correctly before pickup, but I only want to drive up to the Columbia River store once. I can’t fit 4×8′ sheets inside my SUV and I don’t have the saw to make those long cuts nice and neat, so I don’t really have any choice and I don’t feel like standing there for hours dodging the toddlers and dogs that usually invade Home Depot on a Portland weekend.The cut sizes are:

  • 60-1/4” x 27-1/8” for the aft section, between the bench bases
  • 57” x 46” for the mid section, from the galley base to the wall
  • 74-3/4” x 26” for the fore section, under the fridge and the helm
  • 78” x 25-1/2” for the cockpit section and step

I’ll probably have to trim these a bit, especially around the various cockpit obstructions. And then waterproof any gaps. Remember, the three cabinet bases I already built have built-in floor sections, which means they’re modular and easily removed or replaced.

These floor sections will give me a level surface throughout, providing important stability by distributing the loads under the two seat pedestals and the table/berth pedestal. The RETROvan’s deck itself is simply a 1/8″ or maybe 3/16″ layer of diamond plate steel. It’s adequately strong, but pretty flexy when you walk across it.

Once positioned, I’ll screw the plywood down and cut out an access panel for the starter battery in the cockpit section.

The next step will be to drill 5/16″ holes through the plywood and steel to bolt down the pedestals and helm. I’ve got the hardware in hand, including some 1-1/2″ fender washers for underneath. And hopefully that’s enough to minimize any wobbliness. If not, then it’s time to add some steel plates belowdecks. Fortunately for the table/berth pedestal, there is already a steel spine running down the center of the RETROvan.

The rubberized black & white ‘puzzle’ tiles will go down later, maybe even at a 45° angle.

Rollback

Today seemed like a good day to clean up the driveway and reposition the RETROvan over to the side so that Olivia has more room to park her new Escape.

But of course the starter battery was dead again, so I had to jump it with my little BoltPower kit. The engine finally kicked over and I moved the rig to the end of the driveway and put the parking brake back on.

I left the engine running hoping to exercise it a bit and recharge the battery. I then spent the next half hour blowing and sweeping the driveway under where the RETROvan was parked. So far, so good.

My first concern was that the oil catch pan we used while removing and re-installing the engine had a lot of fluid in it, and it was mostly red which means either blood or transmission fluid. I finally got the driveway clean and disposed of the bodily fluids properly.

The next thing I know, I hear the RETROvan’s engine stop so I look up and think, “Weird, did it run out of gas or what?” But then to my horror, the van starts rolling back down the driveway towards me!

So I dropped everything and sprinted to the open door, dove over the open battery compartment hatch and grabbed the brake pedal with all my might.

I’ve actually had recent nightmares like this, and now this is actually happening?! Premonition…

The RETROvan eased to a stop but not after bumping a concrete planter and moving it a few inches. Nothing major, but if I had not been there it would have slammed right into the corner of the garage. Or worse, it could have run over Mazy or caused me to spill a beer.

Here’s my security camera video of the Rollback. It’s quite heroic.

So now, of course, the engine won’t start again because the battery is worn out. I jump-started it again and managed to get the rig into the position I wanted and secured the rear wheels with chocks. But clearly the parking brake is not doing anything. It’s relying on the transmission to keep the RETROvan from rolling, and that’s just not safe.

Worse, I discovered that everywhere the rig had come to a rest, there was a fresh puddle of transmission fluid on the concrete. So I broke out a bag of cat litter to soak those puddles up.

My next email was to McFarland’s Mobile Mechanics to get Brett back out here under warranty service. Their reply was, “If it’s anything we caused then we can cover it under warranty.” Seeing as how I paid them around $2,000 to remove and reinstall an engine, you would expect the result to be leak-free, wouldn’t you? We’ll see how that goes…

Meanwhile, I ordered a new Duracell Ultra group 29NF starter battery (not to be confused with the house batteries in the helm) from Batteries Plus. And guess what? Yep, that’s a very non-standard battery made for old fleet trucks, and nobody stocks it locally.

So Tuesday’s the day for a fresh battery and another visit from Brett.